模拟器和反调试检测

1 背景

在Android开发过程中,防作弊一直是老生常谈的问题,而模拟器和反调试的检测往往是防作弊中的重要一环。

2 模拟器检测

模拟器检测的本质就是要利用模拟器和真机之间的微小差异,从而判断当前设备是否为模拟器,具体检测技术框架整理如图1所示。
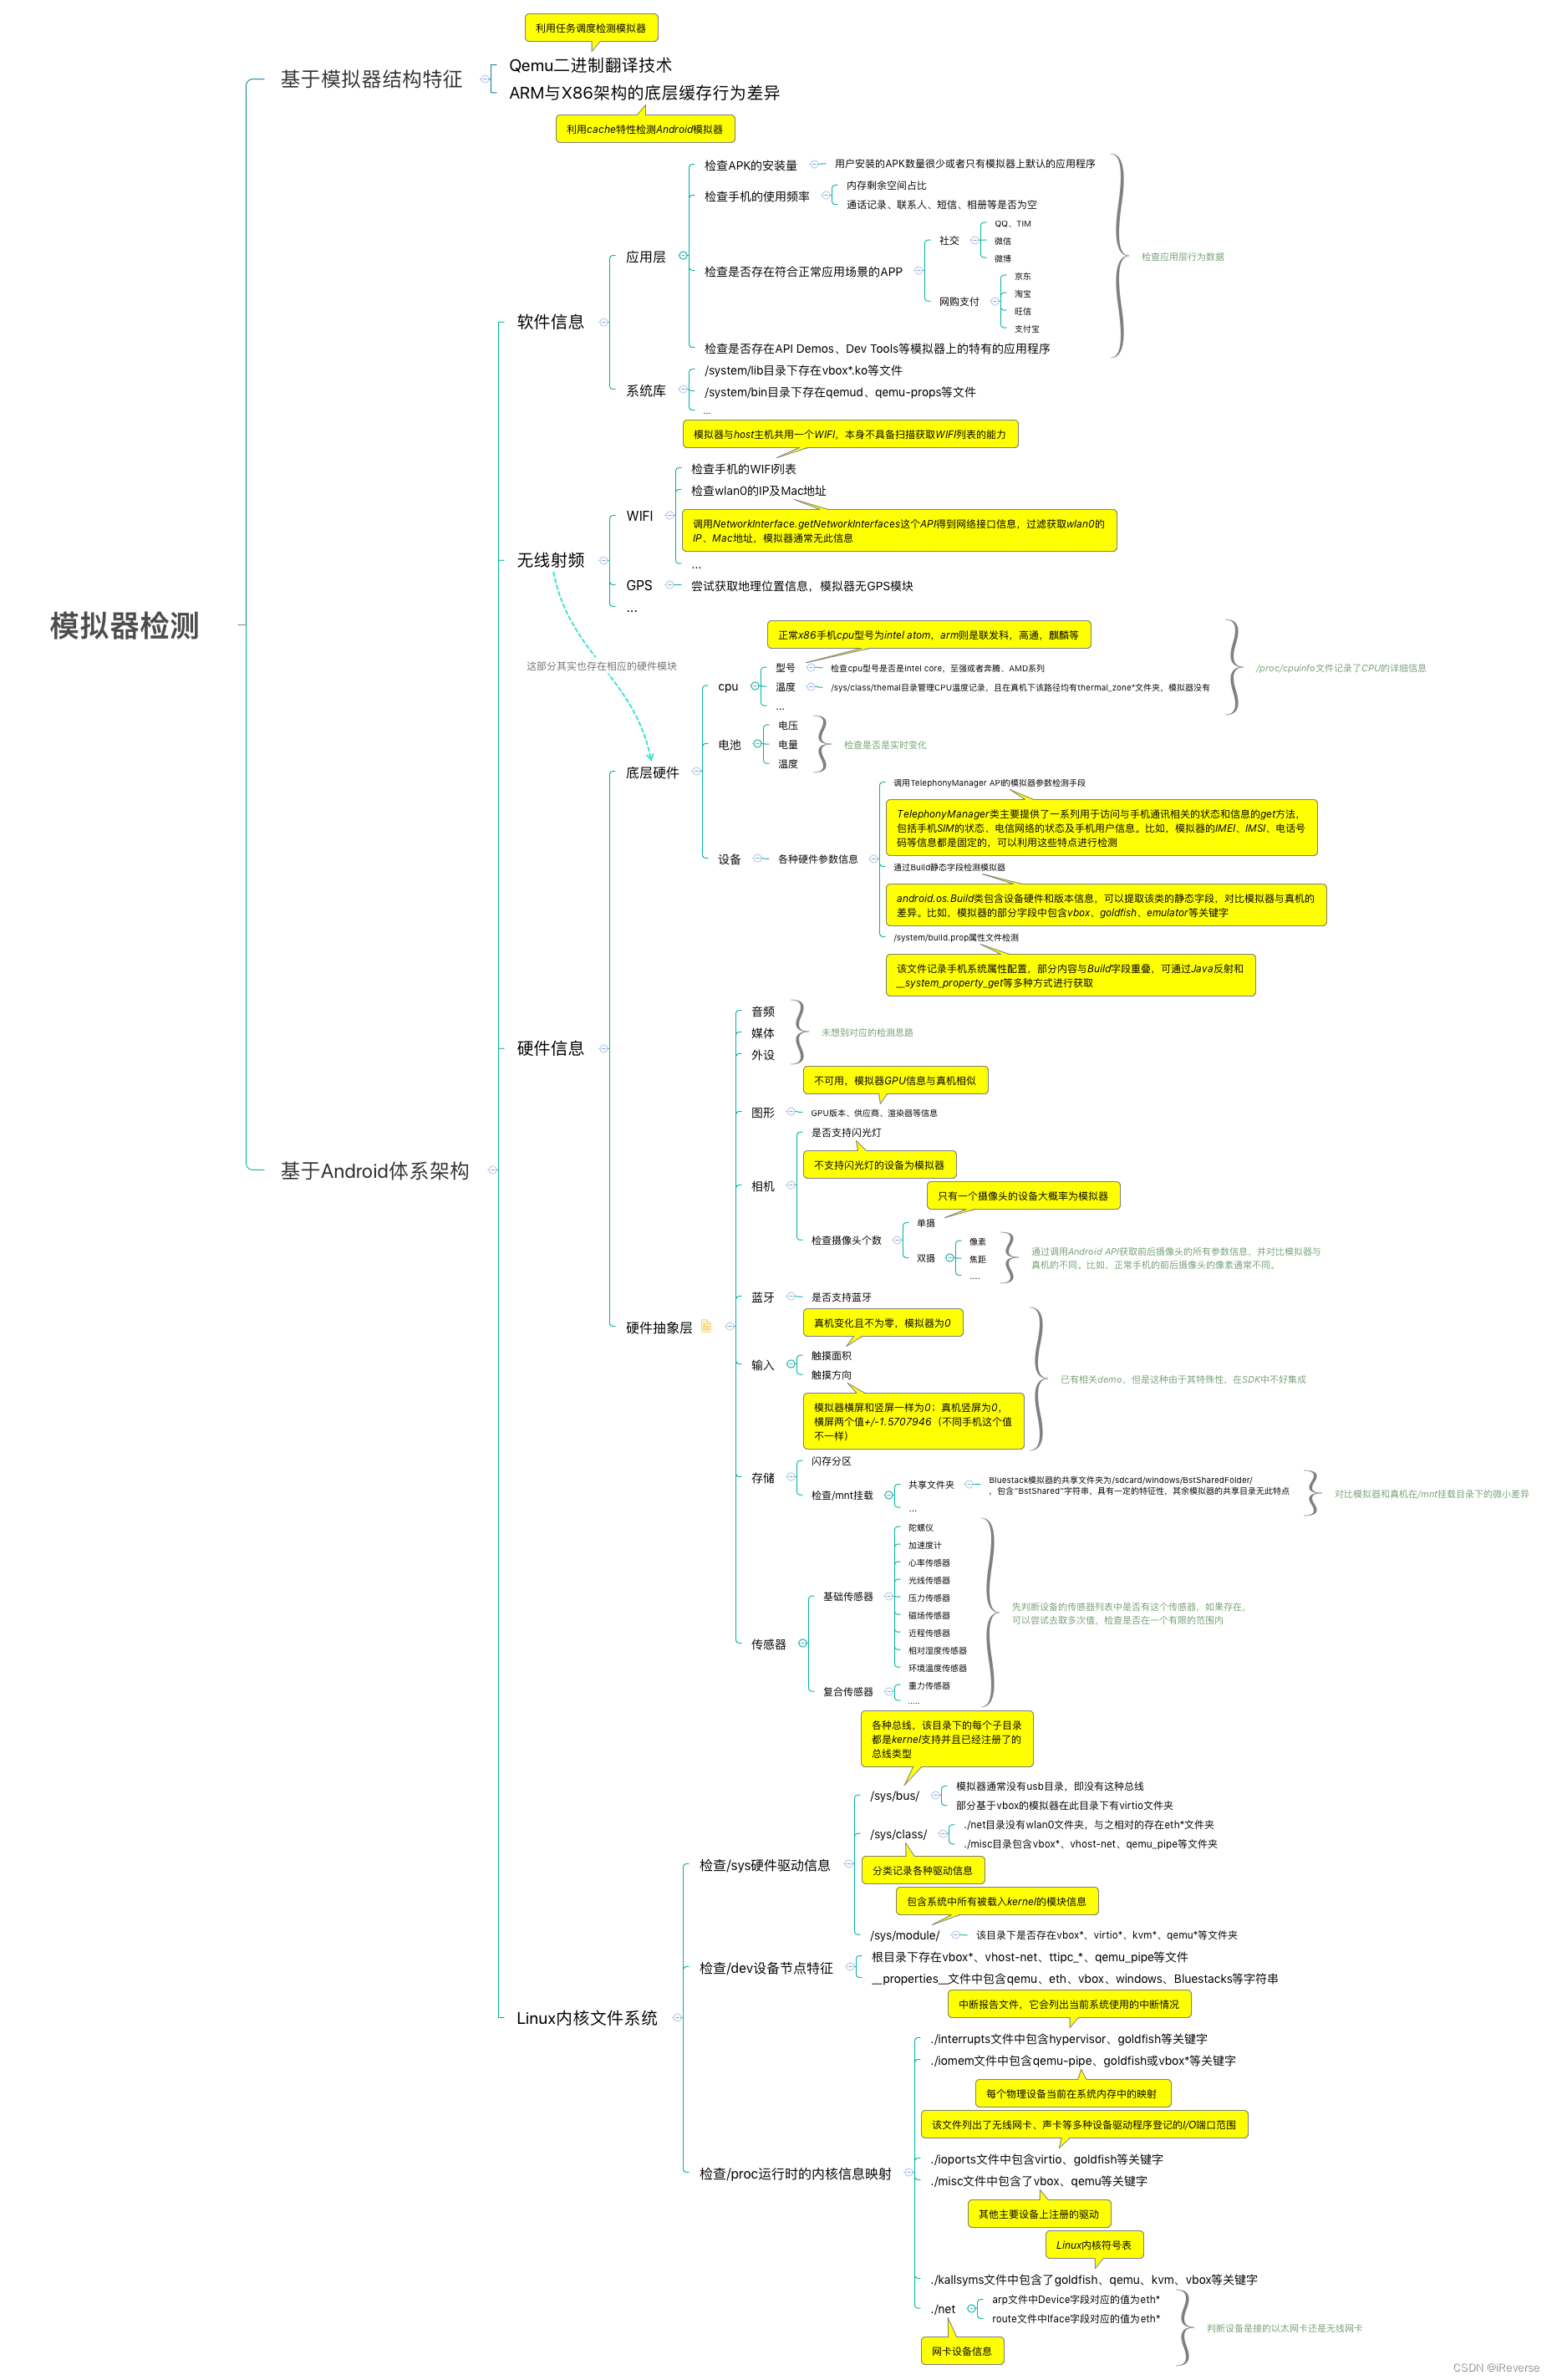
图1 模拟器检测技术框架

通常是在入口点、入口页面分析有没有模拟器检测,一种检测代码的Java实现如下所示

1
2
3
4
5
6
7
8
9
10
11
12
13
14
15
16
17
18
19
20
21
22
23
24
25
26
27
28
29
30
31
32
33
34
35
36
37
38
39
40
41
42
43
44
45
46
47
48
49
50
51
52
53
54
55
56
57
58
59
60
61
62
63
64
65
66
67
68
69
70
71
72
73
74
75
76
77
78
79
80
81
82
83
84
85
86
87
88
89
90
91
92
93
94
95
96
97
98
99
100
101
102
103
104
105
106
107
108
109
110
111
112
113
114
115
116
117
118
119
120
121
122
123
124
125
126
127
128
129
130
131
132
133
134
135
136
137
138
139
140
141
142
143
144
145
146
147
148
149
150
151
152
153
154
155
156
157
158
159
160
161
162
163
164
165
166
167
168
169
170
171
172
173
174
175
176
177
178
179
180
181
182
183
184
185
186
187
188
189
190
191
192
193
194
195
196
197
198
199
200
201
202
203
204
205
206
207
208
209
210
211
212
213
214
215
216
217
218
219
220
221
222
223
224
225
226
227
228
229
230
231
232
233
234
235
236
237
238
239
240
241
242
243
244
package com.qianyu.antiemulator;

import java.io.BufferedReader;
import java.io.File;
import java.io.FileInputStream;
import java.io.IOException;
import java.io.InputStream;
import java.io.InputStreamReader;

import android.content.Context;
import android.telephony.TelephonyManager;
import android.util.Log;

public class AntiEmulator {

// 检测“/dev/socket/qemud”,“/dev/qemu_pipe”这两个通道
private static String[] known_pipes = { "/dev/socket/qemud",
"/dev/qemu_pipe" };

public static boolean checkPipes() {
for (int i = 0; i < known_pipes.length; i++) {
String pipes = known_pipes[i];
File qemu_socket = new File(pipes);
if (qemu_socket.exists()) {
Log.v("Result:", "Find pipes!");
return true;
}
}
Log.i("Result:", "Not Find pipes!");
return false;
}

// 检测驱动文件内容
// 读取文件内容,然后检查已知QEmu的驱动程序的列表
private static String[] known_qemu_drivers = { "goldfish" };

public static Boolean checkQEmuDriverFile() {
File driver_file = new File("/proc/tty/drivers");
if (driver_file.exists() && driver_file.canRead()) {
byte[] data = new byte[1024]; // (int)driver_file.length()
try {
InputStream inStream = new FileInputStream(driver_file);
inStream.read(data);
inStream.close();
} catch (Exception e) {
// TODO: handle exception
e.printStackTrace();
}
String driver_data = new String(data);
for (String known_qemu_driver : AntiEmulator.known_qemu_drivers) {
if (driver_data.indexOf(known_qemu_driver) != -1) {
Log.i("Result:", "Find know_qemu_drivers!");
return true;
}
}
}
Log.i("Result:", "Not Find known_qemu_drivers!");
return false;
}

// 检测模拟器上特有的几个文件
private static String[] known_files = {
"/system/lib/libc_malloc_debug_qemu.so", "/sys/qemu_trace",
"/system/bin/qemu-props" };

public static Boolean CheckEmulatorFiles() {
for (int i = 0; i < known_files.length; i++) {
String file_name = known_files[i];
File qemu_file = new File(file_name);
if (qemu_file.exists()) {
Log.v("Result:", "Find Emulator Files!");
return true;
}
}
Log.v("Result:", "Not Find Emulator Files!");
return false;
}

// 检测模拟器默认的电话号码
private static String[] known_numbers = { "15555215554", "15555215556",
"15555215558", "15555215560", "15555215562", "15555215564",
"15555215566", "15555215568", "15555215570", "15555215572",
"15555215574", "15555215576", "15555215578", "15555215580",
"15555215582", "15555215584", };

public static Boolean CheckPhoneNumber(Context context) {
TelephonyManager telephonyManager = (TelephonyManager) context
.getSystemService(Context.TELEPHONY_SERVICE);

String phonenumber = telephonyManager.getLine1Number();

for (String number : known_numbers) {
if (number.equalsIgnoreCase(phonenumber)) {
Log.v("Result:", "Find PhoneNumber!");
return true;
}
}
Log.v("Result:", "Not Find PhoneNumber!");
return false;
}

// 检测设备IDS 是不是 “000000000000000”
private static String[] known_device_ids = { "000000000000000" };

public static Boolean CheckDeviceIDS(Context context) {
TelephonyManager telephonyManager = (TelephonyManager) context
.getSystemService(Context.TELEPHONY_SERVICE);

String device_ids = telephonyManager.getDeviceId();

for (String know_deviceid : known_device_ids) {
if (know_deviceid.equalsIgnoreCase(device_ids)) {
Log.v("Result:", "Find ids: 000000000000000!");
return true;
}
}
Log.v("Result:", "Not Find ids: 000000000000000!");
return false;
}

// 检测imsi id是不是“310260000000000”
private static String[] known_imsi_ids = { "310260000000000" };

public static Boolean CheckImsiIDS(Context context) {
TelephonyManager telephonyManager = (TelephonyManager) context
.getSystemService(Context.TELEPHONY_SERVICE);

String imsi_ids = telephonyManager.getSubscriberId();

for (String know_imsi : known_imsi_ids) {
if (know_imsi.equalsIgnoreCase(imsi_ids)) {
Log.v("Result:", "Find imsi ids: 310260000000000!");
return true;
}
}
Log.v("Result:", "Not Find imsi ids: 310260000000000!");
return false;
}

// 检测手机上的一些硬件信息
public static Boolean CheckEmulatorBuild(Context context) {
String BOARD = android.os.Build.BOARD;
String BOOTLOADER = android.os.Build.BOOTLOADER;
String BRAND = android.os.Build.BRAND;
String DEVICE = android.os.Build.DEVICE;
String HARDWARE = android.os.Build.HARDWARE;
String MODEL = android.os.Build.MODEL;
String PRODUCT = android.os.Build.PRODUCT;
if (BOARD == "unknown" || BOOTLOADER == "unknown" || BRAND == "generic"
|| DEVICE == "generic" || MODEL == "sdk" || PRODUCT == "sdk"
|| HARDWARE == "goldfish") {
Log.v("Result:", "Find Emulator by EmulatorBuild!");
return true;
}
Log.v("Result:", "Not Find Emulator by EmulatorBuild!");
return false;
}

// 检测手机运营商家
public static boolean CheckOperatorNameAndroid(Context context) {
String szOperatorName = ((TelephonyManager) context
.getSystemService("phone")).getNetworkOperatorName();
if (szOperatorName.toLowerCase().equals("android") == true) {
Log.v("Result:", "Find Emulator by OperatorName!");
return true;
}
Log.v("Result:", "Not Find Emulator by OperatorName!");
return false;
}

// 基于模拟器cpu信息的检测
// cpu信息检测主要是在cpu信息看看是否包含intel、amd等字段,很多模拟器目前对于cpu信息还无法进行模拟。
//模拟器的cpu和真机的cpu有所不同
//一般而言模拟器读取的是电脑上的cpu,电脑是Inter或者AMD,那么模拟器的cpu也是Inter或者AMD,而手机一般是ARM。
//要读取cpu信息,可以用java代码或者c代码,用c代码就要使用jni。
public static String readCpuInfo() {
String result = "";
try {
String[] args = { "/system/bin/cat", "/proc/cpuinfo" };
ProcessBuilder cmd = new ProcessBuilder(args);

Process process = cmd.start();
StringBuffer sb = new StringBuffer();
String readLine = "";
BufferedReader responseReader = new BufferedReader(
new InputStreamReader(process.getInputStream(), "utf-8"));
while ((readLine = responseReader.readLine()) != null) {
sb.append(readLine);
}
responseReader.close();
result = sb.toString().toLowerCase();
} catch (IOException ex) {
}
return result;
}

private boolean checkCPUInfo() {
//String[] blockList = "google_sdk,sdk,sdk_x86,vbox86p".split(",");
String cpuInfo = readCpuInfo();
if ((cpuInfo.contains("intel") || cpuInfo.contains("amd"))) {
return true;
}
return false;
}

//关键路径检测特定模拟器检测
private static String[] known_bluestacks = {
"/data/app/com.bluestacks.appmart-1.apk",
"/data/app/com.bluestacks.BstCommandProcessor-1.apk",
"/data/app/com.bluestacks.help-1.apk",
"/data/app/com.bluestacks.home-1.apk",
"/data/app/com.bluestacks.s2p-1.apk",
"/data/app/com.bluestacks.searchapp-1.apk",
"/data/bluestacks.prop",
"/data/data/com.androVM.vmconfig",
"/data/data/com.bluestacks.accelerometerui",
"/data/data/com.bluestacks.appfinder",
"/data/data/com.bluestacks.appmart",
"/data/data/com.bluestacks.appsettings",
"/data/data/com.bluestacks.BstCommandProcessor",
"/data/data/com.bluestacks.bstfolder",
"/data/data/com.bluestacks.help",
"/data/data/com.bluestacks.home",
"/data/data/com.bluestacks.s2p",
"/data/data/com.bluestacks.searchapp",
"/data/data/com.bluestacks.settings",
"/data/data/com.bluestacks.setup",
"/data/data/com.bluestacks.spotlight",
"/mnt/prebundledapps/bluestacks.prop.orig"
};

public static boolean checkBlueStacksFiles() {
for (int i = 0; i < known_bluestacks.length; i++) {
String file_name = known_bluestacks[i];
File qemu_file = new File(file_name);
if (qemu_file.exists()) {
Log.e("Result:", "Find BlueStacks Files!");
return true;
}
}
Log.e("Result:", "Not Find BlueStacks Files!");
return false;
}
}

3 self_debugging反调试检测

反调试在代码保护中扮演着很重要的角色,虽然不能完全阻止攻击者,但是还是能加大攻击者的时间成本,一般与加壳结合使用,核心还是加壳部分。

反调试可以分为两类:一类是检测,另一类是攻击,前者是去想各种办法去检测程序是否在被调试,如果正在被调试的话做出一些“反”的举措,比如退出等等,(当然这里退出不是一个万全之策,因为你暴露了反调试的位置点,这样攻击者就比较容易过反调试,更好的是想办法不让攻击者发现,并且跳到另一个位置,让攻击者懵逼)。

在这里看到的反调试都是以检测手段为主,也是比较常用的思路,当然也是一种低级反调试,因为容易爆露反调试点,只有在做反调试系统的时候这些手段交杂多用,才能给逆向者增加一定的成本开销。

3.1 关键文件检测

通过so文件是可以找到JNl_onload,它是编译可执行文件,进在Exports模块下搜索start,找main函数的入口函数。

3.1.1 基本思路

我们知道在调试进程的时候,进程会被IDA中的android_server ptrace,并且这个进程名字存在于/proc/pid/cmdline中,当然这里的pid指的是android_server的进程号,这个可以通过TracePid来获得。

因此说在这里可以检测这个名字,如果有这个名字说明正在被调试,那我们就可以kill掉这个程序。

一般情况下,android_server都会放在/data/local/tmp/文件夹下,因此我们可以检测这个文件夹是不是有android_server文件,如果有,程序就退出。

在这里我们可以发现这个思路好像很白痴,如果我们把这个名字改掉,然后放到别的目录下,就可以对付这个反调试策略了。

3.1.2 具体检测操作

有了基本思路,接下来我们就开始实现,实现的示例代码如下:

1
2
3
4
5
6
7
8
9
10
11
12
13
14
15
16
17
18
19
20
21
22
23
24
25
26
27
28
29
30
31
32
33
34
35
36
37
38
39
40
41
42
43
//filecheck.cpp

#include <stdio.h>
#include <unistd.h>
#include <string.h>
#include <dirent.h>

//检测android_server文件
void check() {
const char* rootPath = "/data/local/tmp";
DIR* dir;
dir = opendir(rootPath);
int pid = getpid();
if (dir!= NULL) {
dirent *currentDir;
while ((currentDir = readdir(dir)) != NULL) {
//readdir()方法就像java中迭代器的next()方法一样
//currentDir->d_name; //文件名,目录名
//currentDir->d_type; //类型,是目录还是文件啥的
if(strncmp(currentDir->d_name,"android_server",14)==0){
printf("%s",currentDir->d_name);
kill(pid,SIGKILL);
}
}
closedir(dir); //用完要关掉,要不然会出错
} else{
}
}

int main() {
//声明两个字符数组
char str[6]={'q','i','a','n','y','u'};
char rstr[6];
int size=sizeof(str);
int len=strlen(str);
check();
int i;
for(i=0;i<len;i++) {
rstr[size-i-1]=str[i];
}
printf("反转后的字符串:%s\n",rstr);
return 0;
}

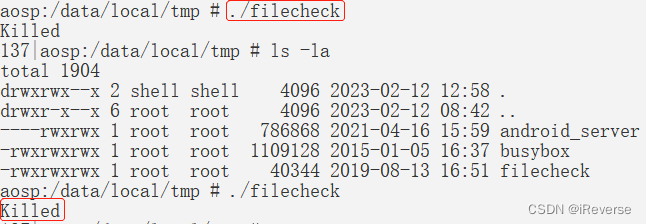
通过上述实现,关键文件检测达到的效果如图2所示。

图2 关键文件检测效果

3.2 端口检测

3.2.1 基本思路

我们知道android_server的默认监听的端口号是23946,所以可以通过检测这个端口号来起到一定的反调试作用,在Linux系统中在/proc/net/tcp会记录这些连接信息。

在这里我们可以换个端口就可以对付这个反调试策略了。

3.2.2 具体检测操作

有了基本思路,接下来我们就开始实现,实现的示例代码如下:

1
2
3
4
5
6
7
8
9
10
11
12
13
14
15
16
17
18
19
20
21
22
23
24
25
26
27
28
29
30
31
32
33
34
35
36
37
38
39
40
41
42
43
44
45
46
47
48
49
50
51
52
53
//checkTCP.cpp

#include <unistd.h>
#include <stdio.h>

int num = 54321;

//检测常用的端口
void check() {
FILE* pfile=NULL;
char buf[0x1000]={0};
// 执行命令
char* strCatTcp= "cat /proc/net/tcp |grep :5D8A";
char* strNetstat="netstat |grep :23946";
pfile=popen(strCatTcp,"r");
int pid=getpid();
if(NULL==pfile) {
printf("打开命令失败!\n");
return;
}
// 获取结果
while(fgets(buf,sizeof(buf),pfile)) {
// 执行到这里,判定为调试状态
printf("执行cat /proc/net/tcp |grep :5D8A的结果:\n");
printf("%s",buf);
int ret=kill(pid,SIGKILL);
}
pclose(pfile);
}
int main() {
int x = 2;
int y = 3;
int key;
x = x ^ y;
y = x ^ y;
x = x ^ y;
int X = x ^ y;
int Y = x & y;
Y= Y << 1;
int X0 = X ^ Y;
int Y0 = X & Y;
Y0 = Y0 << 1;
if (Y0==0) {
key = X0+4543;
}
int encrypt = num ^ key;
int decrypt = encrypt ^ key;
check();
printf("加密前:%d\n",num);
printf("加密后值:%d\n",encrypt);
printf("解密后值:%d\n", decrypt);
return 0;
}

通过上述实现,调试的时候检测到23946有tcp连接会退出,达到的效果如图3所示。

图3 关键端口检测效果

3.3 进程名称检测

3.3.1 基本思路

在调试状态下,Linux会向/proc/pid/status写入一些进程状态信息,比如最大的变化是TracerPid字段会写入调试进程的pid,图4是在调试前后/proc/pid/status的文件的变化。

图4 调试前后TracerPid字段值的变化

解决方案:
一是以debug模式启动,在JNI_Onload处下断点,找到那个调用方法NOP掉;
二是直接静态分析JNI_Onload,直接去掉方法的调用。

3.3.2 具体检测操作

有了基本思路,接下来我们就开始实现,实现的示例代码如下:

1
2
3
4
5
6
7
8
9
10
11
12
13
14
15
16
17
18
19
20
21
22
23
24
25
26
27
28
29
30
31
32
33
34
35
36
37
38
39
40
41
42
43
44
45
46
47
48
49
50
51
52
53
54
55
56
57
58
59
60
61
62
63
64
65
66
67
68
69
70
71
72
73
74
75
76
77
//filecheck.cpp

#include <stdio.h>
#include <string.h>
#include <unistd.h>

//进程名称检测
void coursecheck(){
const int bufsize = 1024;
char filename[bufsize];
char line[bufsize];
char name[bufsize];
char nameline[bufsize];
int pid = getpid();
//先读取Tracepid的值
sprintf(filename, "/proc/%d/status", pid);
FILE *fd=fopen(filename,"r");
if(fd!=NULL) {
while(fgets(line,bufsize,fd)) {
if(strstr(line,"TracerPid")!=NULL) {
int statue =atoi(&line[10]);
if(statue!=0) {
sprintf(name,"/proc/%d/cmdline",statue);
FILE *fdname=fopen(name,"r");
if(fdname!= NULL) {
while(fgets(nameline,bufsize,fdname)) {
if(strstr(nameline,"android_server")!=NULL)
{
int ret=kill(pid,SIGKILL);
}
}
}
fclose(fdname);
}
}
}
}
fclose(fd);
}

void order(int* p,int n) {//n:表示数组的长度
int i,j;
int k;
for(i=0;i<n-1;i++) {
for(j=0;j<n-1-i;j++) {
if(*(p+j)>*(p+j+1))
{
k=*(p+j);//k=a;
*(p+j)=*(p+j+1);//a=b;
*(p+j+1)=k; //b=k;
}
}
}
printf("排序后的数组为:");
for(i=0;i<n;i++) {
if(i%5==0)
printf("\n");
printf("%4d",*(p+i));
}
printf("\n");
}

int main() {
int n;
printf("请输入数组元素的个数:");
scanf("%d",&n);

int sum[n];
printf("请输入各个元素:");
int i;
coursecheck();
for(i=0;i<n;i++) {
scanf("%d",&sum[i]); //scanf("%d",sum+i);
}
order(sum,n);//实现冒泡排序
return 0;
}

【注意】调试可执行程序是Debugger —> run;调试so是Debugger —> attach

3.4 轮循检测

轮询检测反调试技术基于循环检测进程的状态,目的是判断当前进程是否正在被调试,优点是实现比较简单,缺点是系统资源消耗大。

3.4.1 基本思路

读取进程的/proc/pid/status文件,通过该文件得到调试当前进程的调试器(检测调试器的pid)

3.4.2 具体检测操作

通过status文件内的TracerPid字段的值判断当前进程或线程是否正在被调试

【status文件信息】
Name:进程名称
State:进程的状态
Tgid:一般指进程的名称
Pid:一般指进程Id,他的值与getting函数的返回值相等
PPid:父进程的Id
TraceerPid:实现调试功能的进程Id,值为0表示当前进程未被调试

1
2
3
4
5
6
7
8
9
10
11
12
13
14
15
16
17
18
19
20
21
22
23
24
25
26
27
28
29
30
31
32
33
34
35
36
37
38
39
40
41
42
43
44
45
46
47
48
49
50
51
52
53
54
55
56
57
58
59
60
61
62
63
64
65
66
67
// loop.cpp

#include <unistd.h>
#include <stdlib.h>
#include <stdio.h>
#include <errno.h>
#include <pthread.h>

#define TRACERPID "TracerPid:"
#define TRACERPID_LEN (sizeof(TRACERPID) - 1)

void loop() {
while(true) {
sleep(60);
}
}

bool check_debugger(pid_t pid) {
const int pathSize = 256;
const int bufSize = 1024;

char path[pathSize];
char line[bufSize];

snprintf(path, sizeof(path) - 1, "/proc/%d/status", pid);

bool result = true;
FILE *fp = fopen(path, "rt");
if (fp != NULL) {
while (fgets(line, sizeof(line), fp)) {
if (strncmp(line, TRACERPID, TRACERPID_LEN) == 0) {
pid_t tracerPid = 0;

sscanf(line, "%*s%d", &tracerPid);
if (!tracerPid) result = false;

printf("%s", line);
break;
}
}
fclose(fp);
}
return result;
}

void *anti_debugger_thread(void *data) {
pid_t pid = getpid();

while (true) {
check_debugger(pid);
sleep(1);
}
}

void anti_debugger() {
pthread_t tid;
pthread_create(&tid, NULL, &anti_debugger_thread, NULL);
}

int main() {
printf("pid: %d\n", getpid());

anti_debugger();
loop();

return 0;
}

通过上述实现,调试的时候检测到有程序调试时会打印出TracerPid的值,达到的效果如图5所示。

图5 轮循检测反调试

反-反调试方案:

  • 静态修改检测函数或者Hook
  • 编译安卓源码使让TracerPid永久为0

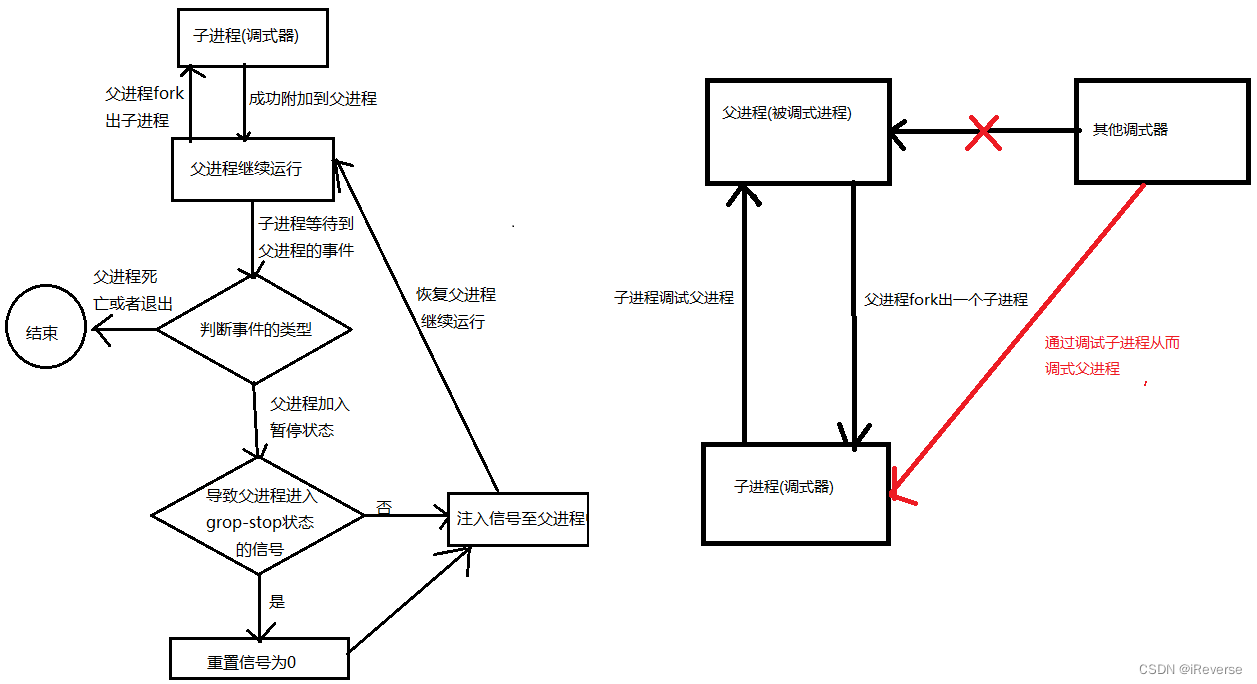
3.5 self-debugging反调试检测

原理:父进程创建一个子进程,通过子进程调试父进程,非常实用、高效的实时反调式技术。

  • 优点:可以作为受保护进程的主流反调试方案;消耗的系统资源比较少;几乎不影响受保护进程性能;可以轻易地阻止其他进程调式受保护的进程
  • 缺点:实现比较复杂

图6 self-debugging反调试检测原理

3.5.1 基本思路

实现:核心ptrace函数和进程的信号机制

【注意】进程暂停状态比较多

1
2
3
4
5
6
7
8
9
10
11
12
13
14
15
16
17
18
19
20
21
22
23
24
25
26
27
28
29
30
31
32
33
34
35
36
37
38
39
40
41
42
43
44
45
46
47
48
49
50
51
52
53
54
55
56
57
58
59
60
61
62
63
64
65
66
67
68
69
70
71
72
73
74
75
76
77
78
79
80
81
82
83
84
85
86
87
88
89
90
91
92
93
94
95
96
97
98
99
100
101
102
103
104
105
106
107
108
109
110
111
112
113
114
115
116
117
118
119
120
121
122
123
124
125
126
127
128
129
130
131
132
// main.cpp

#include <unistd.h>
#include <stdlib.h>
#include <stdio.h>
#include <errno.h>

#include <sys/prctl.h>
#include <sys/types.h>
#include <sys/wait.h>
#include <sys/ptrace.h>

#define eprintf(...) fprintf(stderr, ##__VA_ARGS__)

void loop() {
while(true) {
sleep(60);
}
}

bool may_cause_group_stop(int signo) {
switch(signo) {
case SIGSTOP:
case SIGTSTP:
case SIGTTIN:
case SIGTTOU:
return true;
break;
default:
break;
}

return false;
}

void handle_events() {
int status = 0;
pid_t pid = 0;

do {
pid = TEMP_FAILURE_RETRY(waitpid(-1, &status, __WALL));
if (pid < 0) {
perror("waitpid");
exit(EXIT_FAILURE);
}

if (WIFEXITED(status)) {
eprintf("%d exited, status=%d\n", pid, WEXITSTATUS(status));
}
else if (WIFSIGNALED(status)) {
eprintf("%d killed by signal %d\n", pid, WTERMSIG(status));
}
else if (WIFSTOPPED(status)) {
int signo = WSTOPSIG(status);
eprintf("%d stopped by signal %d\n", pid, signo);

if (may_cause_group_stop(signo)) {
signo = 0;
}

long err = ptrace(PTRACE_CONT, pid, NULL, signo);
if (err < 0) {
perror("PTRACE_CONT");
exit(EXIT_FAILURE);
}
}

} while (!WIFEXITED(status) && !WIFSIGNALED(status));

}

void safe_attach(pid_t pid) {
long err = ptrace(PTRACE_ATTACH, pid, NULL, NULL);
if (err < 0) {
perror("PTRACE_ATTACH");
exit(EXIT_FAILURE);
}

int status = 0;
err = TEMP_FAILURE_RETRY(waitpid(pid, &status, __WALL));
if (err < 0) {
perror("waitpid");
exit(EXIT_FAILURE);
}

if (WIFEXITED(status)) {
eprintf("%d exited, status=%d\n", pid, WEXITSTATUS(status));
exit(EXIT_SUCCESS);
}
else if (WIFSIGNALED(status)) {
eprintf("%d killed by signal %d\n", pid, WTERMSIG(status));
exit(EXIT_SUCCESS);
}
else if (WIFSTOPPED(status)) {
int signo = WSTOPSIG(status);
eprintf("%d stopped by signal %d\n", pid, signo);

if (may_cause_group_stop(signo)) {
signo = 0;
}

err = ptrace(PTRACE_CONT, pid, NULL, signo);
if (err < 0) {
perror("PTRACE_CONT");
exit(EXIT_FAILURE);
}
}

}

void protect_father() {
pid_t ppid = getppid();//获取父进程pid
safe_attach(ppid);
handle_events();
}

int main() {
eprintf("main process pid: %d\n", getpid());
prctl(PR_SET_DUMPABLE, 1, 0, 0, 0);
pid_t pid = fork();
if (pid < 0) {
perror("fork");
}
else if (pid == 0) {
eprintf("child process pid: %d\n", getpid());
protect_father();
exit(EXIT_SUCCESS);
}
eprintf("main process start loop...\n");
loop();
return 0;
}

3.5.2 具体检测操作

对self_debugging来说,pid为3263,子进程pid为3264,debugger通过调试self_debugging的子进程,进而调试self_bugging,一个进程只能被一个进程附加。

图7 self-debugging反调试

反-反调试手段:

  1. 让父进程不fork
  2. 把while函数循环去掉
  3. 不能调试父进程,但可以调试子进程,配合双IDA调试,挂起子进程

通过status文件内的TracerPid字段的值判断当前进程或线程是否正在被调试

3.6 Java层反调试检测

此示例用来演示Java层手动绕过百度加固Debug.isDebuggerConnected反调试的方法

JDWP协议动态调试,安卓程序动态调试条件(两个满足之一即可):
1.在AndroidMainfest.xml中,application标签下Android:debuggable=true
2.系统默认调试,在build.prop(boot.img),ro.debugable=1

Android SDK中有android.os.debug类提供了一个isDebuggerConnected方法,用于判断JDWP调试器是否正在工作

3.6.1 基本思路

使用AndroidKiller反编译APK,找到isDebuggerConnected方法调用,修改程序运行流程即可绕过反调试检测。

3.6.2 具体检测操作

首先使用Jadx反编译小灰机APK,然后查看AndroidMainfest.xml文件,找到application标签下的android:name=”com.baidu.protect.StubApplication”即入口界面,如图8所示。
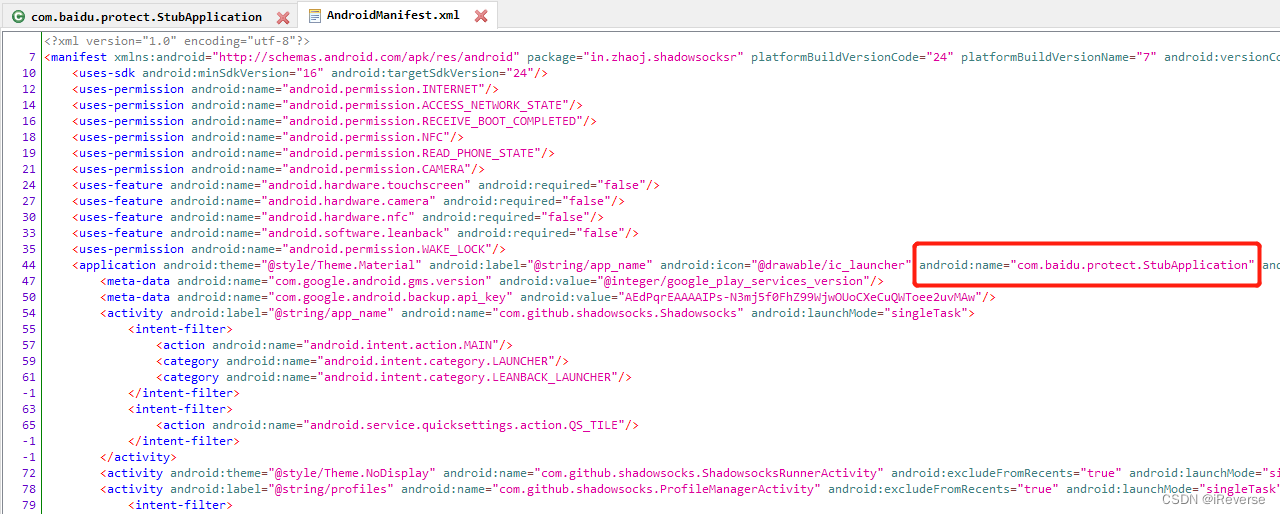
图8 找到入口界面

然后去看StubApplication下的onCreate()方法,我们关注isDebuggerConnected()方法,因为它是用于判断JDWP调式器是否正在工作的标志。
Debug.isDebuggerConnected获取到一个值进行比较,如果为真就进行加载so库,如图9所示。
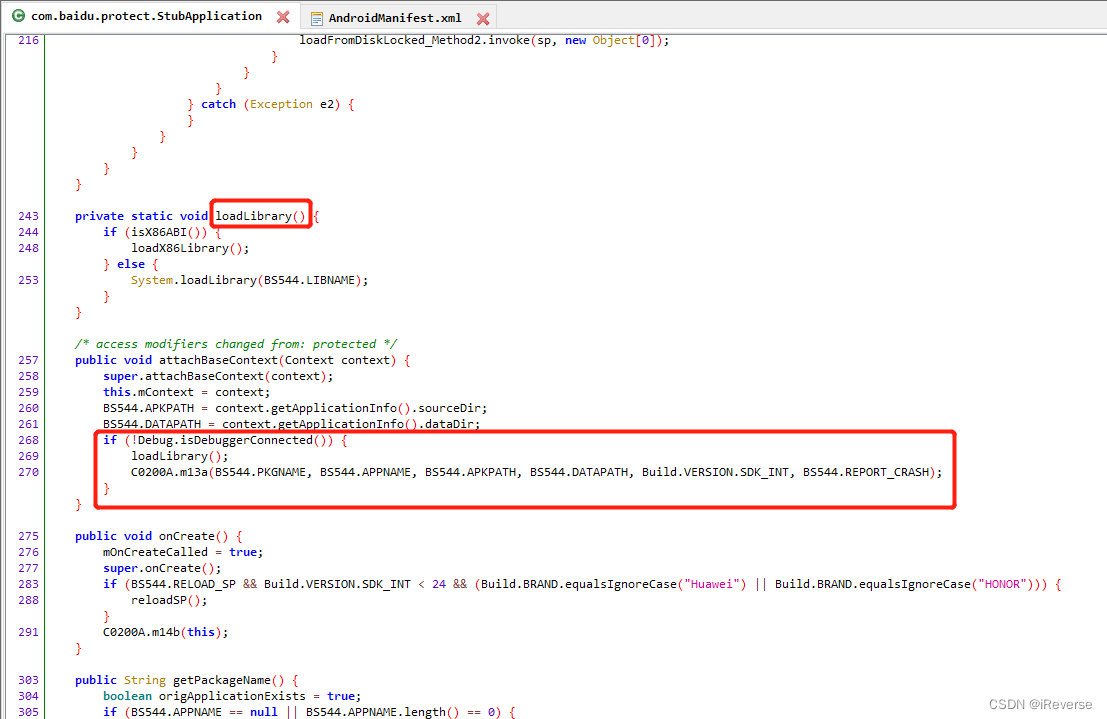
图9 加载so库

所以只有符合条件成立才会执行if里面的逻辑,进行加载so库,这就是在Java层进行反调试,也能用来保护代码。

因此,我们使用AndroidKiller反编译APK,在进而在StubApplication中找到isDebuggerConnected的方法调用,并将if-nez v0, :cond_0修改为if-eqz v0, :cond_0,如图10所示。
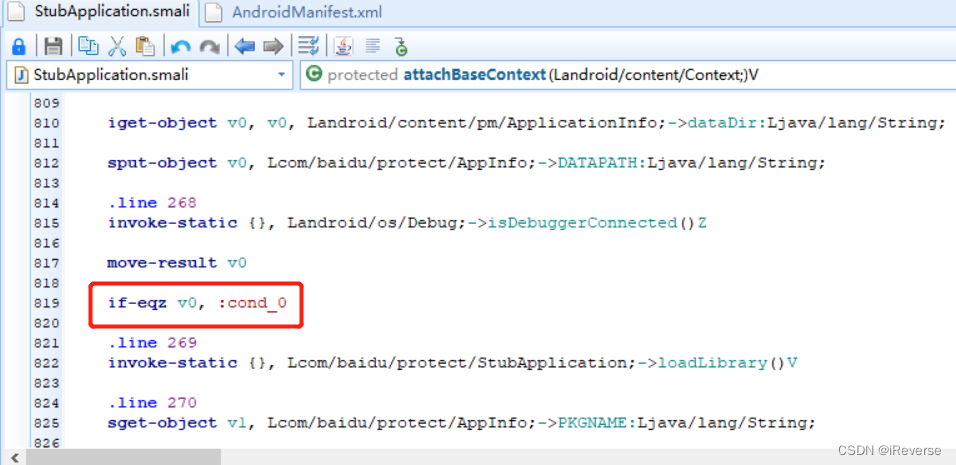
图10 修改程序运行逻辑

3.7 so层反调试检测

此示例用来演示so层手动绕过反调试检测的方法

3.7.1 基本思路

使用IDA进行动静结合分析so文件,然后在动态调试中注释掉so层的检测代码,即可绕过反调试检测。

3.7.2 具体检测操作

首先使用Jadx反编译AntiDebug.apk,然后查看AndroidMainfest.xml文件,发现只有一个MainActivity,进行找到MainActivity只有加载so库antidebug的代码比较可疑,如图11所示。
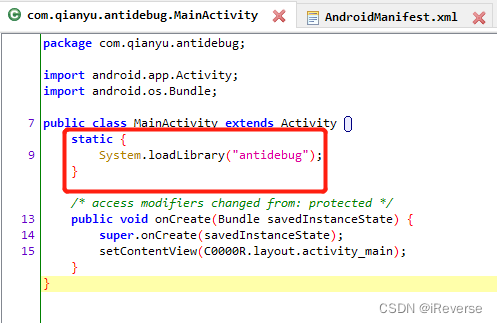
图11 MainActivity加载so库antidebug

静态分析

使用IDA Pro打开APK解压出来的so库libantidebug.so,然后在Exports中发现没有静态注册而只有动态注册的方法,进入JNI_OnLoad后按Tab查看C伪代码如图12所示。

图12 查看JNI_OnLoad后发现三个反调试的函数

然后进行代码分析,赋值后的if判断用了或运算符,后面四个参数有一个满足条件即满足if判断,需要使这四个函数都为假才能绕过。

动态分析

依次输入如下命令进行分析:

./android_server -p 11111
adb forward tcp:11111 tcp:11111
adb shell am start -D -n com.qianyu.antidebug/.MainActivity
打开monitor.bat窗口
打开IDA,填写主机号,端口号(与转发端口一致),勾选三项,选择进程com.qianyu.antidebug,双击进来,F9运行
jdb -connect com.sun.jdi.SocketAttach:hostname=127.0.0.1,port=8600

因为此APK加载了多个so库,所以需要多点击几次F9才能加载到指定的so文件libantidebug.so,如图13所示。
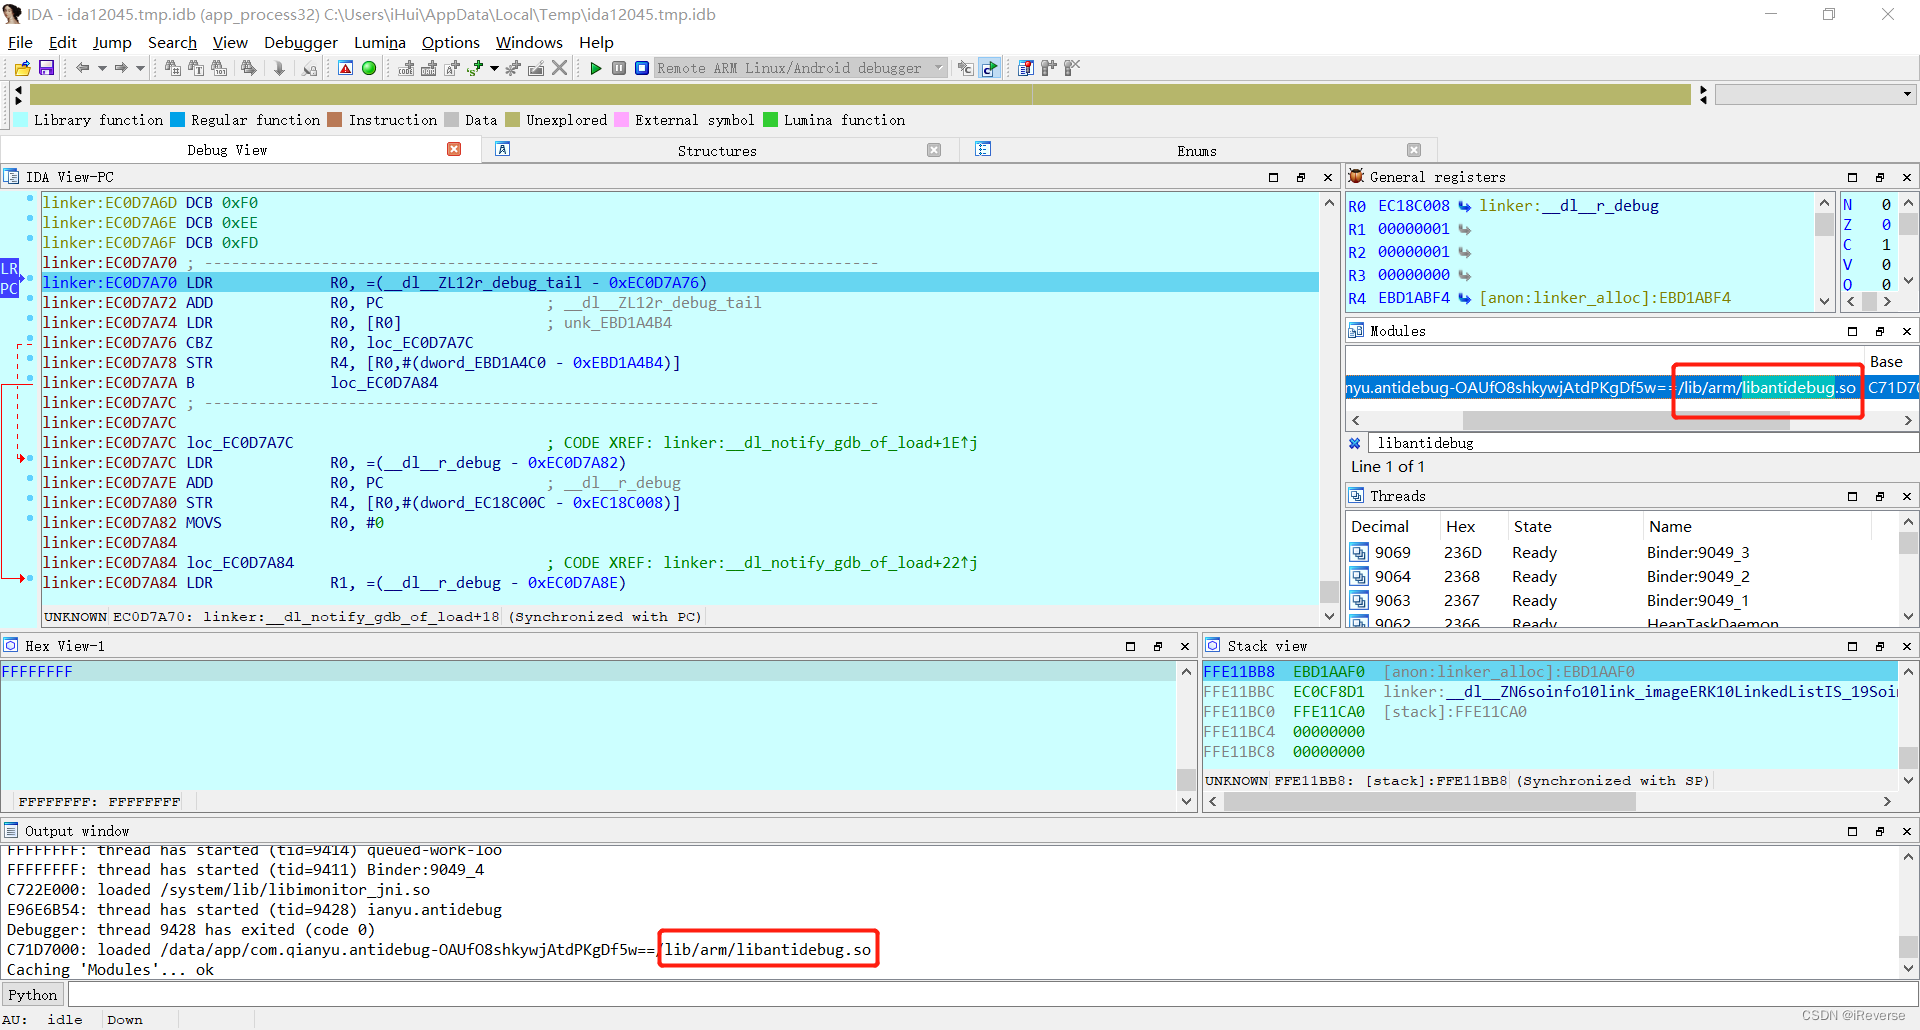
图13 IDA加载libantidebug.so文件

接着在Modules中双击进入libantidebug.so后,再双击进入JNI_OnLoad,按Tab转为伪C代码,对应关系如图14所示。
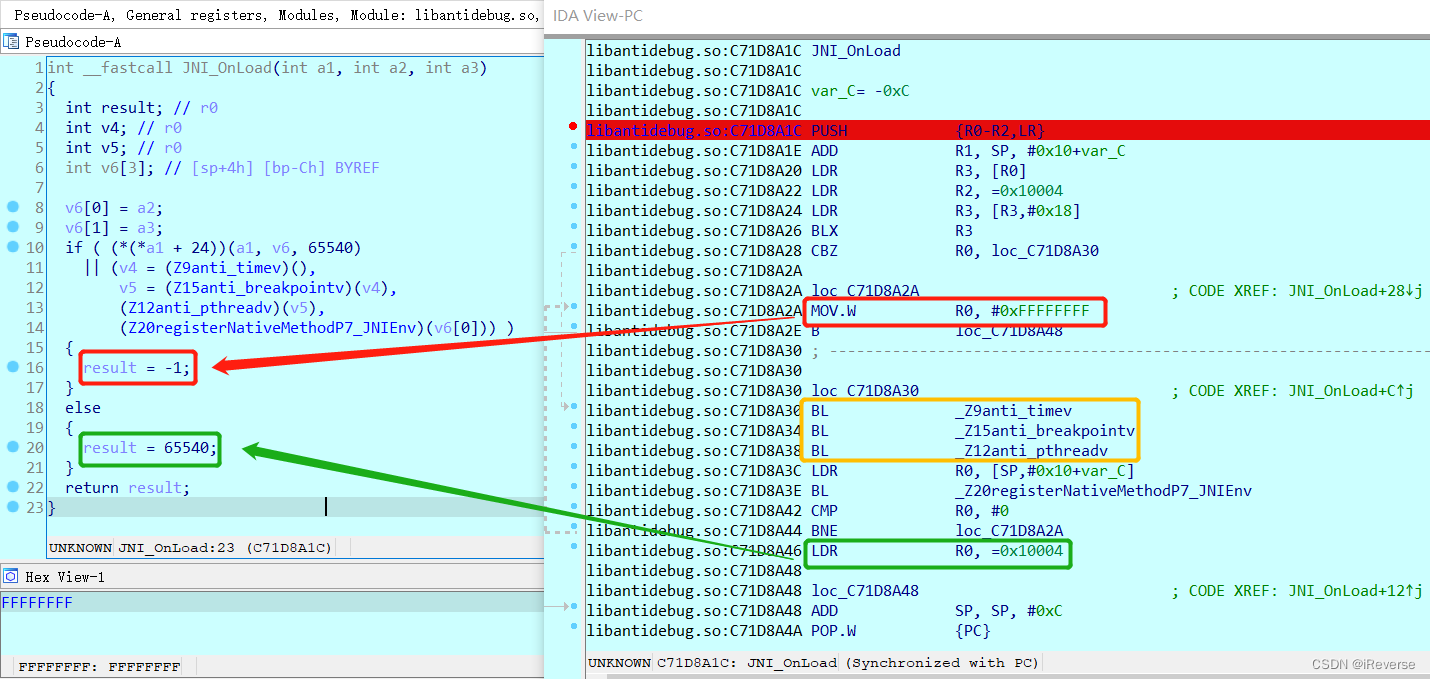
图14 汇编代码与伪C代码的对应关系

因此,我这里需要修改图14中关于反调试的黄色框中的代码,按F2输入00 00 00 00(MOVS R0, R0)后再按F2提交,即可将Z9anti_timevZ15anti_breakpointvZ12anti_pthreadv分别转化为MOVS R0, R0,如图15所示。
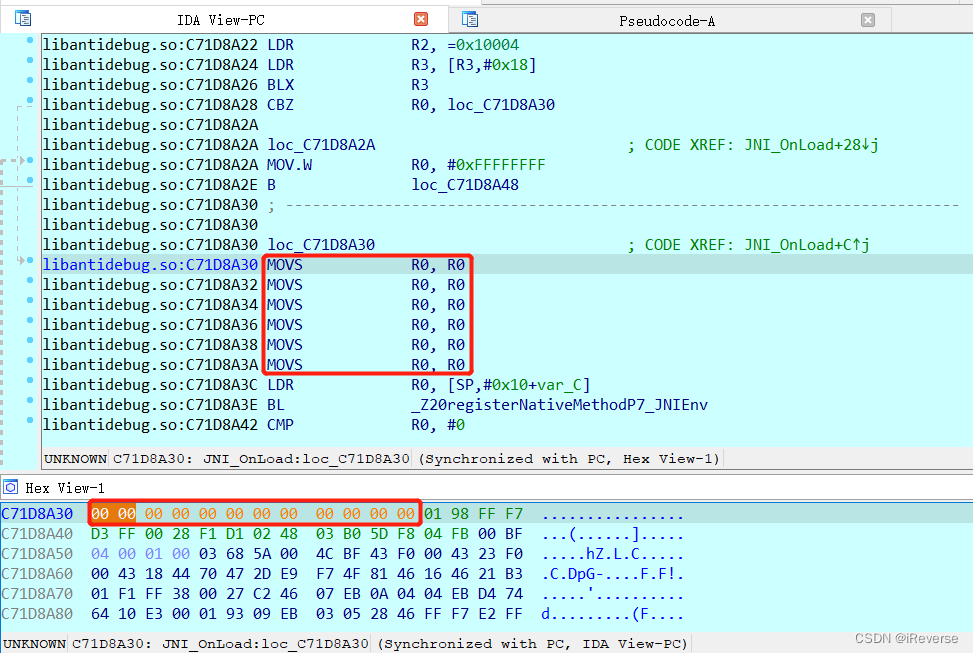
图15 修改汇编代码

最终,我们可以在JNI_OnLoad的汇编代码处下断点,按F8后能绕过反调试检测的代码,如图16所示。
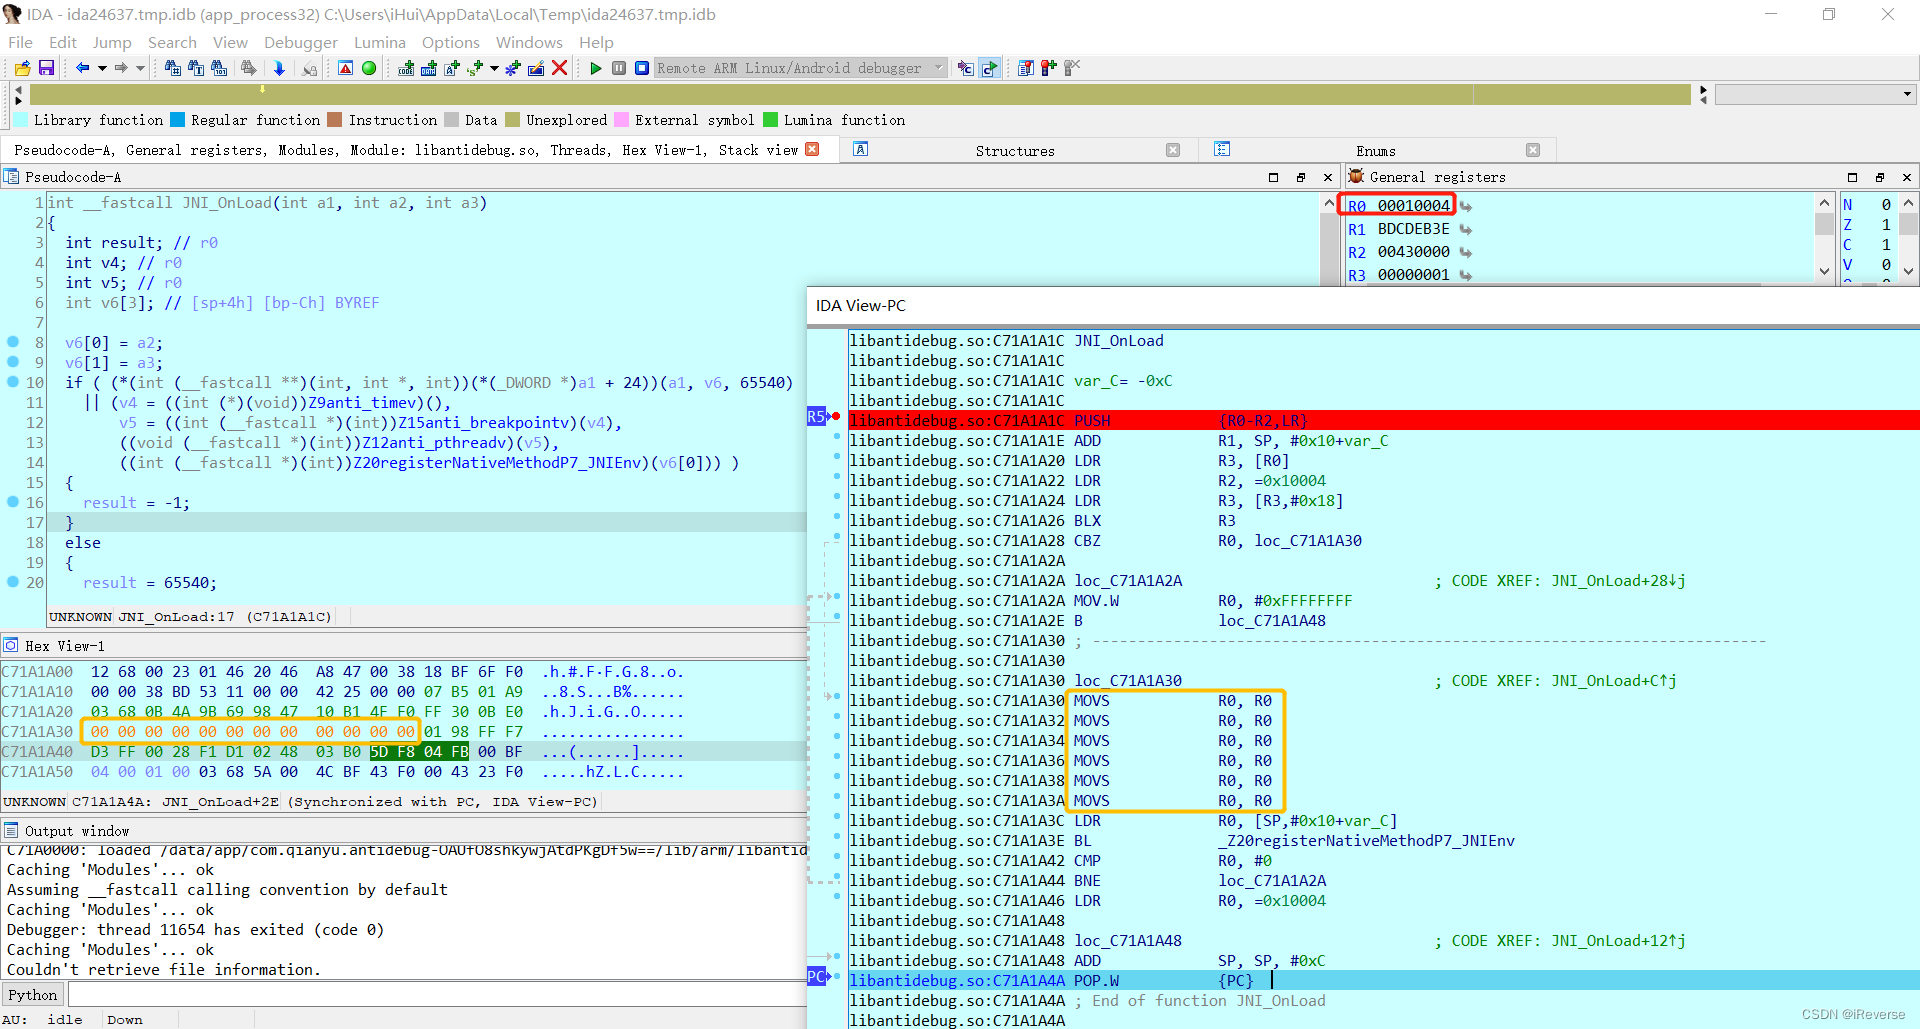
图16 绕过反调试检测代码

实现so层反调试的示例代码如下:

1
2
3
4
5
6
7
8
9
10
11
12
13
14
15
16
17
18
19
20
21
22
23
24
25
26
27
28
29
30
31
32
33
34
35
36
37
38
39
40
41
42
43
44
45
46
47
48
49
50
51
52
53
54
55
56
57
58
59
60
61
62
63
64
65
66
67
68
69
70
71
72
73
74
75
76
77
78
79
80
81
82
83
84
85
86
87
88
89
90
91
92
93
94
95
96
97
98
99
100
101
102
103
104
105
106
107
108
109
110
111
112
113
114
115
116
117
118
119
120
121
122
123
124
125
126
127
128
129
130
131
132
133
134
135
136
137
138
139
140
141
142
143
144
145
146
147
148
149
150
151
152
153
154
155
156
157
158
159
160
161
162
163
164
165
166
167
168
169
170
171
172
173
174
175
176
177
178
179
180
181
182
183
184
185
186
187
188
189
190
191
192
193
194
195
196
197
198
199
200
201
202
203
204
205
206
207
208
209
210
211
212
213
214
215
216
217
218
219
220
221
222
223
224
225
226
227
228
229
230
231
232
233
234
235
236
237
238
239
240
241
242
243
244
245
246
247
248
249
250
251
252
253
254
255
256
257
258
259
260
261
262
263
264
265
266
267
268
269
270
// antidebug.cpp

#include <jni.h>
#include <stdio.h>
#include <stdlib.h>
#include <string.h>
#include <unistd.h>
#include <sys/ptrace.h>
#include <sys/inotify.h>
#include <elf.h>
#include <pthread.h>
#include <sys/types.h>
#include <fcntl.h>
#include <signal.h>
#include <android/log.h>

#define LOG_TAG "qianyu"
#define LOGV(...) __android_log_print(ANDROID_LOG_VERBOSE, LOG_TAG, __VA_ARGS__)
#define LOGD(...) __android_log_print(ANDROID_LOG_DEBUG, LOG_TAG, __VA_ARGS__)
#define LOGI(...) __android_log_print(ANDROID_LOG_INFO, LOG_TAG, __VA_ARGS__)
#define LOGW(...) __android_log_print(ANDROID_LOG_WARN , LOG_TAG, __VA_ARGS__)
#define LOGE(...) __android_log_print(ANDROID_LOG_ERROR , LOG_TAG, __VA_ARGS__)

#define MAX 1024

//检测代码执行时间差
jint anti_time(){
int pid = getpid();
struct timeval t1;
struct timeval t2;
struct timezone tz;
gettimeofday(&t1, &tz);
gettimeofday(&t2, &tz);
int timeoff = (t2.tv_sec) - (t1.tv_sec);
LOGD("time %d",timeoff);
if (timeoff > 1) {
int ret = kill(pid, SIGKILL);
return 1;
}
return 0;
}

//inotify检测
jint anti_inotify(){
const int MAXLEN = 2048;
int ppid =getpid();
char buf[1024],readbuf[MAXLEN];
int pid, wd, ret,len,i;
int fd;
fd_set readfds;
//防止调试子进程
ptrace(PTRACE_TRACEME, 0, 0, 0);
fd = inotify_init();
sprintf(buf, "/proc/%d/maps",ppid);

wd = inotify_add_watch(fd, buf, IN_ALL_EVENTS);
if (wd < 0) {
LOGD("can't watch %s",buf);
return 0;
}
while (1) {
i = 0;
//注意要对fd_set进行初始化
FD_ZERO(&readfds);
FD_SET(fd, &readfds);
//第一个参数固定要+1,第二个参数是读的fdset,第三个是写的fdset,最后一个是等待的时间
//最后一个为NULL则为阻塞
//select系统调用是用来让我们的程序监视多个文件句柄的状态变化
ret = select(fd + 1, &readfds, 0, 0, 0);
if (ret == -1)
break;
if (ret) {
len = read(fd,readbuf,MAXLEN);
while(i < len){
//返回的buf中可能存了多个inotify_event
struct inotify_event *event = (struct inotify_event*)&readbuf[i];
LOGD("event mask %d\n",(event->mask&IN_ACCESS) || (event->mask&IN_OPEN));
//这里监控读和打开事件
if((event->mask&IN_ACCESS) || (event->mask&IN_OPEN)){
LOGD("kill!!!!!\n");
//事件出现则杀死父进程
int ret = kill(ppid,SIGKILL);
LOGD("ret = %d",ret);
return 1;
}
i+=sizeof (struct inotify_event) + event->len;
}
}
}
inotify_rm_watch(fd,wd);
close(fd);
return 0;
}

/*
* 检测在调试状态下的软件断点(断点扫描)
* 读取其周围的偏移地址有没有ARM等指令集的断点指令
* 遍历so中可执行segment,查找是否出现breakpoint指令即可
* */
unsigned long GetLibAddr() {
unsigned long ret = 0;
char name[] = "libantidebug.so";
char buf[4096], *temp;
int pid;
FILE *fp;
pid = getpid();
sprintf(buf, "/proc/%d/maps", pid);
fp = fopen(buf, "r");
if (fp == NULL) {
puts("open failed");
goto _error;
}
while (fgets(buf, sizeof(buf), fp)) {
if (strstr(buf, name)) {
temp = strtok(buf, "-");//将buf由"-"参数分割成片段
ret = strtoul(temp, NULL, 16);//将字符串转换成unsigned long(无符号长整型数)
break;
}
}
_error: fclose(fp);
return ret;
}

jint anti_breakpoint(){
Elf32_Ehdr *elfhdr;
Elf32_Phdr *pht;
unsigned int size, base, offset,phtable;
int n, i,j;
char *p;
//从maps中读取elf文件在内存中的起始地址
base = GetLibAddr();
if(base == 0){
LOGD("find base error/n");
return 0;
}
elfhdr = (Elf32_Ehdr *) base;
phtable = elfhdr->e_phoff + base;
for(i=0;i<elfhdr->e_phnum;i++){
pht = (Elf32_Phdr*)(phtable+i*sizeof(Elf32_Phdr));
if(pht->p_flags&1){
offset = pht->p_vaddr + base + sizeof(Elf32_Ehdr) + sizeof(Elf32_Phdr)*elfhdr->e_phnum;
LOGD("offset:%#x ,len:%#x",offset,pht->p_memsz);
p = (char*)offset;
size = pht->p_memsz;
for(j=0,n=0;j<size;++j,++p){
if(*p == 0x10 && *(p+1) == 0xde){
n++;
LOGD("### find thumb bpt %#x /n",p);
return 1;
}else if(*p == 0xf0 && *(p+1) == 0xf7 && *(p+2) == 0x00 && *(p+3) == 0xa0){
n++;
LOGD("### find thumb2 bpt %#x /n",p);
return 1;
}else if(*p == 0x01 && *(p+1) == 0x00 && *(p+2) == 0x9f && *(p+3) == 0xef){
n++;
LOGD("### find arm bpt %#x /n",p);
return 1;
}
}
LOGD("### find breakpoint num: %d/n",n);
}
}
return 0;
}

//多进程/线程
int pipefd[2];
int childpid;
int isAnti=0;

void *anti_thread(void*){
int statue=-1,alive=1,conut=0;
close(pipefd[1]);
while(read(pipefd[0],&statue,4)>0)
break;
sleep(1);
//这里改为非阻塞
fcntl(pipefd[0],F_SETFL,O_NONBLOCK);
LOGI("pip-->read=%d",statue);
while(true){
LOGI("pip-->read=%d",statue);
read(pipefd[0],&statue,4);
sleep(1);
LOGI("pip-->read=%d",statue);
if(statue!=0){
if(isAnti==0)
return NULL;
kill(childpid,SIGKILL);
kill(getpid(),SIGKILL);
return NULL;
}
statue=-1;
isAnti=1;
}
}

void anti(){
int pid,p;
FILE *fd;
char filename[MAX];
char line[MAX];
pid=getpid();
//读取/proc/pid/status中的tracerPid
sprintf(filename,"/proc/%d/status",pid);
p=fork();
if(p==0){
LOGI("child");
//关闭子进程的读管道
close(pipefd[0]);
int pt,alive=0;
//子进程反调试
pt=ptrace(PTRACE_TRACEME,0,0,0);
while(true){
fd=fopen(filename,"r");
while(fgets(line,MAX,fd)){
if(strstr(line,"TracerPid")!=NULL){
LOGI("line %s",line);
int statue=atoi(&line[10]);
LOGI("tracer pid:%d",statue);
write(pipefd[1],&statue,4);
fclose(fd);
if(statue!=0){
LOGI("tracer pid:%d",statue);
return;
}
break;
}
}
sleep(1);
}
}else{
LOGI("father");
childpid=p;
}
}

jint anti_pthread(){
// id_0:新线程标识符
pthread_t id_0;
id_0=pthread_self();
pipe(pipefd);
pthread_create(&id_0,NULL,anti_thread,(void*)NULL);
LOGI("start");
anti();
return 0;
}

JNINativeMethod nativeMethod[]={};

jint registerNativeMethod(JNIEnv* env){
jclass clszz=env->FindClass("com/qianyu/antidebug/MainActivity");
if(env->RegisterNatives(clszz,nativeMethod,sizeof(nativeMethod)/sizeof(nativeMethod[0]))!=JNI_OK){
return JNI_ERR;
}
return JNI_OK;
}

JNIEXPORT jint JNICALL JNI_OnLoad(JavaVM* vm, void* reserved){
JNIEnv* env;
if(vm->GetEnv((void**)&env,JNI_VERSION_1_4)!=JNI_OK){
return JNI_ERR;
}
anti_time();
anti_breakpoint();
anti_pthread();
if(registerNativeMethod(env)!=JNI_OK){
return JNI_ERR;
}
return JNI_VERSION_1_4;
}

4 参考文献

[1]丰生强. Android软件安全权威指南[M]. 电子工业出版社, 2019.
[2]https://www.youtube.com/watch?v=zW74yNjpGZg
[3]https://blog.csdn.net/feibabeibei_beibei/article/details/60956307
[4]https://www.cnblogs.com/momin/p/11422567.html
[5]https://blog.csdn.net/freeking101/article/details/106755116
[6]https://www.freebuf.com/articles/mobile/291894.html
[7]https://blog.csdn.net/YJJYXM/article/details/108516203


转载请注明来源,欢迎对文章中的引用来源进行考证,欢迎指出任何有错误或不够清晰的表达,可以邮件至 xingshuaikun@163.com。

×

喜欢就点赞,疼爱就打赏