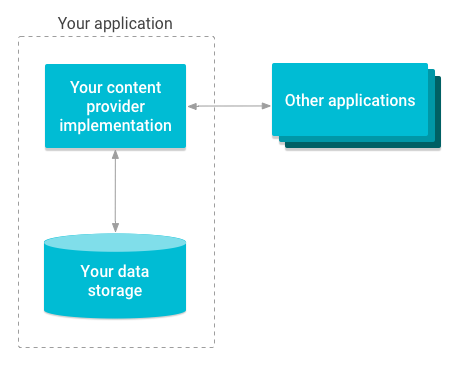
1 BroadcastReceiver简介 1.1 BroadcastReceiver概览 内容提供程序有助于应用管理其自身和其他应用所存储数据的访问,并提供与其他应用共享数据的方法。它们会封装数据,并提供用于定义数据安全性的机制。内容提供程序是一种标准接口,可将一个进程中的数据与另一个进程中运行的代码进行连接。通过配置内容提供程序,可以使其他应用安全地访问和修改应用数据,如图1所示。
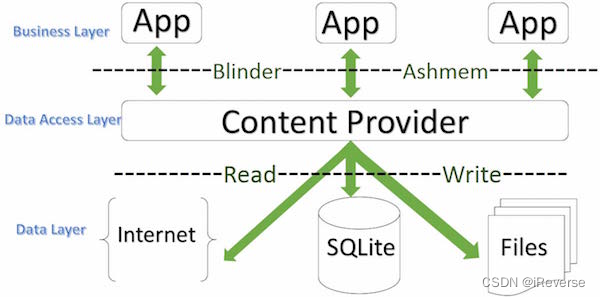
内容提供者组件通过请求从一个应用程序向其他的应用程序提供数据。这些请求由类ContentResolver的方法来处理。内容提供者可以使用不同的方式来存储数据。数据可以被存放在数据库,文件,甚至是网络,如图2所示。
内容提供程序的优点如下:
内容提供程序可精细控制数据访问权限。可以选择仅在应用内限制对内容提供程序的访问,授予访问其他应用数据的权限,或配置读取和写入数据的不同权限;
可以使用内容提供程序将细节抽象化,以用于访问应用中的不同数据源。例如,应用可能会在SQLite数据库中存储结构化记录,以及视频和音频文件。如果在应用中实现此开发模式,则可使用内容提供程序访问所有这类数据;
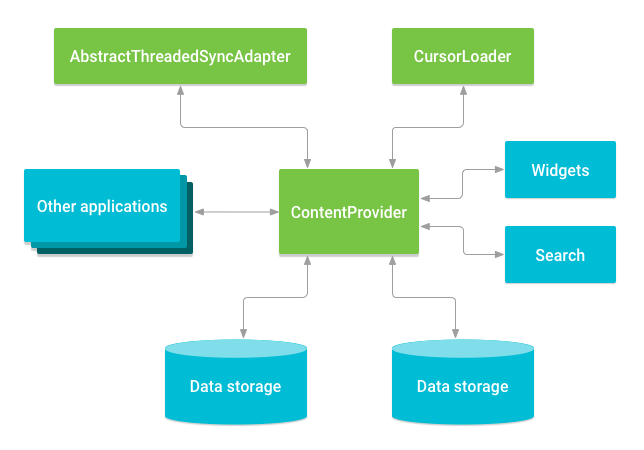
CursorLoader 对象依赖于内容提供程序来运行异步查询,进而将结果返回至应用的界面层。
内容提供程序以一个或多个表的形式将数据呈现给外部应用,这些表与关系型数据库中的表类似。行表示提供程序收集的某种类型数据的实例,行中的每一列表示为一个实例所收集的单个数据。内容提供程序协调很多不同的API和组件对应用数据存储层的访问,如图3所示,其中包括:
1.2 访问提供程序 如需访问内容提供程序中的数据,可以客户端的形式使用应用的Context 中的ContentResolver 对象与提供程序进行通信。ContentResolver 对象会与提供程序对象(即实现ContentProvider 的类的实例)通信。提供程序对象从客户端接收数据请求、执行请求的操作并返回结果。此对象的某些方法可调用提供程序对象(ContentProvider 某个具体子类的实例)中的同名方法。ContentResolver 方法可提供持久性存储空间的基本“CRUD”(创建、检索、更新和删除)功能。
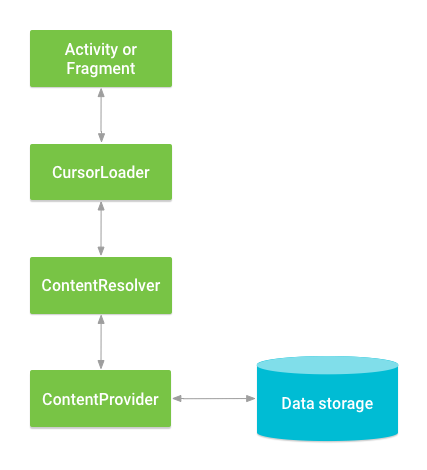
从界面访问ContentProvider 的常用模式是使用CursorLoader 在后台运行异步查询。界面中的Activity 或Fragment 会调用查询的CursorLoader ,其转而使用ContentResolver 获取ContentProvider 。如此一来,用户便可在查询运行时继续使用界面。如图4所示,此模式涉及很多不同对象的交互,以及底层存储机制。
1.3 内容URI资源访问格式 内容URI 用来在提供程序中标识数据。内容URI包括整个提供程序的符号名称(其授权 )和指向表的名称(路径 )。当调用客户端方法以访问提供程序中的表时,该表的内容URI将是其参数之一。
content://packagename+classname/path
其中,字符串content:// 是Android官方定义的前缀,会将其标识为内容URI;packagename 是提供程序的包名;classname 是包下的类名;path 是类中提供程序的类型。
2 创建内容提供程序 内容提供程序管理对中央数据存储区的访问。如要实现提供程序,需将其作为Android应用中的一个或多个类,以及清单文件中的元素。其中一个类会实现子类ContentProvider ,即提供程序与其他应用之间的接口。尽管内容提供程序旨在向其他应用提供数据,但应用中的某些Activity必定允许用户查询和修改提供程序所管理的数据。
2.1 实现ContentProvider类 和之前提到的一样,想重新自定义自己程序中的四大组件,就必须重新实现一个类,重写这个类中的抽象方法,在清单文件中注册,最后才能够正常使用。ContentProvider 实例会处理其他应用发送的请求,从而管理对结构化数据集的访问。所有形式的访问最终都会调用ContentResolver ,后者接着通过调用ContentProvider 的具体方法来获取访问权限。
2.1.1 必需方法 抽象类ContentProvider定义了六个抽象方法,必须将其作为具体子类的一部分加以实现。以下所有方法(onCreate() 除外)均由尝试访问内容提供程序的客户端应用调用:
query() :从提供程序中检索数据。使用参数选择要查询的表、要返回的行和列以及结果的排序顺序。将数据作为Cursor 对象返回。
insert() :在提供程序中插入新行。使用参数选择目标表并获取要使用的列值。返回新插入行的内容URI。
update() :更新提供程序中的现有行。使用参数选择要更新的表和行,并获取更新后的列值。返回已更新的行数。
delete() :从提供程序中删除行。使用参数选择要删除的表和行。返回已删除的行数。
getType() :返回内容URI对应的MIME类型。
onCreate() :初始化提供程序。创建提供程序后,Android系统会立即调用此方法。请注意,只有在ContentResolver对象尝试访问您的提供程序时,系统才会创建它。
请注意,这些方法与同名的ContentResolver 方法拥有相同的签名,在实现这些方法时应考虑以下事项:
所有这些方法(onCreate() 除外)均可由多个线程同时调用,因此它们必须是线程安全的方法。
避免在onCreate() 中执行冗长的操作。将初始化任务推迟到实际需要时执行。
代码只需返回要求的数据类型,而无需执行任何其他操作。例如,您可能想防止其他应用向某些表插入数据。如要实现此目的,可以忽略insert() 调用并返回0。
2.1.2 具体实现
实现query()方法
ContentProvider.query() 方法必须返回Cursor 对象,如果失败,系统会抛出Exception 。如果使用SQLite数据库作为数据存储,则只需返回由SQLiteDatabase 类的某个query() 方法返回的Cursor 。如果查询不匹配任何行,则应该返回一个Cursor 实例(其getCount() 方法返回0)。只有当查询过程中出现内部错误时,才应该返回null 。
如果不使用SQLite数据库作为数据存储,请使用Cursor 的某个具体子类。例如,在MatrixCursor 类实现的游标中,每行都是一个Object 数组。对于此类,请使用addRow() 来添加新行。
请记住,Android系统必须能够跨进程边界传达Exception。Android可以为以下异常执行此操作,这些异常可能有助于处理查询错误:
实现insert()方法
insert() 方法会使用ContentValues 参数中的值,向相应表中添加新行。如果ContentValues 参数中未包含列名称,可能希望在提供程序代码或数据库模式中提供其默认值。
此方法应返回新行的内容URI。如要构造此方法,请使用withAppendedId() 向表的内容URI追加新行的_ID(或其他主键)值。
实现delete()方法
delete() 方法无需从数据存储中实际删除行。如果将同步适配器与提供程序一起使用,则应考虑为已删除的行添加“删除”标志,而不是完全移除行。同步适配器可以检查是否存在已删除的行,并将这些行从服务器中移除,然后再将其从提供程序中删除。
实现update()方法
update() 方法与insert() 采用相同的ContentValues 参数,并且该方法与delete() 及ContentProvider.query() 采用相同的selection 和selectionArgs 参数。如此一来,便可在这些方法之间重复使用代码。
实现onCreate()方法
Android系统会在启动提供程序时调用onCreate() 。在此方法中,应该只执行快速运行的初始化任务,并将数据库创建和数据加载推迟到提供程序实际收到数据请求时进行。如果在onCreate() 中执行冗长的任务,则会减慢提供程序的启动速度。反之,这将减慢提供程序对其他应用的响应速度。
实现getType()方法
getType() 方法会返回MIME格式的String ,后者描述内容URI参数返回的数据类型。Uri 参数可以是模式,而非特定的URI;在此情况下,应该返回与匹配该模式的内容URI相关联的数据类型。
对于文本、HTML或JPEG等常见数据类型,getType() 应该为该数据返回标准的MIME类型。对于指向一行或多行表数据的内容URI,getType()应该以Android供应商特有的MIME格式返回MIME类型:
类型部分:vnd
子类型部分:
如果URI模式用于单个行:android.cursor.item/
如果URI模式用于多个行:android.cursor.dir/
提供程序特有部分:vnd.<name>.<type>
提供<name> 和<type> 。<name> 值应具有全局唯一性,<type> 值应在对应的URI模式中具有唯一性。适合选择公司的名称或应用Android软件包名称的某个部分作为<name> ,适合选择URI关联表的标识字符串作为<type> 。
例如,如果提供程序的授权是com.example.app.provider ,并且它公开了名为table1 的表,则table1 中多个行的MIME类型为:
vnd.android.cursor.dir/vnd.com.example.provider.table1
对于table1 的单个行,MIME类型为:
vnd.android.cursor.item/vnd.com.example.provider.table1
2.2 设计数据存储 内容提供程序是以结构化格式保存的数据的接口。创建该接口之前,必须确定数据的存储方式。可以按自己的喜好以任何形式存储数据,然后根据需要设计读写数据的接口。
以下是Android中提供的一些数据存储技术:
如要处理结构化数据,则可考虑采用关系型数据库(如SQLite)或非关系型键值数据存储区(如LevelDB )。如要处理非结构化数据(如音频、图像或视频媒体),则可考虑以文件形式存储数据。可以混用和配合使用几种不同类型的存储技术,并在必要时使用单个内容提供程序将其公开。
Android系统可与Room持久化库进行交互,后者提供对SQLite数据库API的访问权限,而Android自有提供程序可使用SQLite数据库API存储面向表格的数据。如要使用此库创建数据库,请遵照Room 持久化库指南中的说明,将RoomDatabase 的子类实例化。请记住,不必使用数据库来实现存储区。提供程序在外部表现为一组表,与关系型数据库类似,但这并非对提供程序内部实现的要求。
为了存储文件数据,Android提供各种面向文件的API。
在极少数情况下,可以通过为单个应用实现多个内容提供程序受益。例如,可以使用一个内容提供程序与微件共享某些数据,并公开与其他应用共享的另一组数据。
如要使用基于网络的数据,请使用java.net 和android.net 中的类。也可将基于网络的数据同步至本地数据存储(如数据库),然后以表格或文件的形式提供这类数据。
数据存储设计过程中需要考虑许多事项,以下是一些设计提供程序数据结构的技巧:
表格数据应始终有“主键”列,提供程序会将其作为每行的唯一数值加以维护。可以使用此值将某行链接到其他表中的相关行(将其用作“外键”)。尽管可以随意命名此列,但请最好使用BaseColumns._ID ,因为将提供程序查询的结果链接至ListView 的条件是,检索到的某一列名称必须是_ID 。
如果想提供位图图像或其他非常庞大的文件导向型数据,请将数据存储在文件中,然后间接提供这些数据,而非直接将其存储在表格中。如果执行了此操作,则需告知提供程序的用户,他们需使用ContentResolver 文件方法来访问数据。
使用二进制大型对象(BLOB)数据类型存储大小或结构多变的数据。例如,可以使用BLOB列存储协议缓冲区或JSON结构。
2.3 实现内容提供程序权限 安全与权限主题中详细描述了Android系统各方面的权限和访问。数据存储主题也描述了各类存储实行中的安全与权限。其中的要点简述如下:
默认情况下,存储在设备内部存储上的数据文件是应用和提供程序的私有数据文件。
创建的SQLiteDatabase 数据库是应用和提供程序的私有数据库。
默认情况下,保存到外部存储的数据文件是公用且可全局读取的数据文件。无法使用内容提供程序来限制对外部存储内文件的访问,因为其他应用可使用其他API调用对这些文件执行读取和写入操作;
如果某个方法调用用于打开或创建设备内部存储的文件或SQLite数据库,则该调用可能会向所有其他应用同时授予读取和写入访问权限。如果将内部文件或数据库用作提供程序的存储区,并向其授予“可全局读取”或“可全局写入”访问权限,则在清单文件中为提供程序设置的权限不会保护数据。在内部存储中,文件和数据库的默认访问权限是“私有”,并且不应该为提供程序的存储区更改此权限。
如果想使用内容提供程序权限来控制对数据的访问,则应将数据存储在内部文件、SQLite数据库或“云”中(例如,远程服务器上),而且应保持文件和数据库为您的应用所私有。
2.4 创建ContentProvider的步骤 要创建我们自己的Content Provider的话,我们需要遵循以下几步:
创建一个继承了ContentProvider 父类的类
定义一个名为CONTENT_URI ,并且是public static final的Uri类型的类变量,必须为其指定一个唯一的字符串值,最好的方案是以类的全名称, 如:public static final Uri CONTENT_URI = Uri.parse( “content://com.google.android.MyContentProvider”);
创建数据存储系统 。大多数Content Provider使用Android文件系统或SQLite数据库来保持数据,但是也可以以任何想要的方式来存储。
定义要返回给客户端的数据列名 。如果正在使用Android数据库,则数据列的使用方式就和以往所熟悉的其他数据库一样。但是,必须为其定义一个叫_id的列,它用来表示每条记录的唯一性。
如果要存储字节型数据,比如位图文件等,那保存该数据的数据列其实是一个表示实际保存文件的URI字符串,客户端通过它来读取对应的文件数据,处理这种数据类型的Content Provider需要实现一个名为_data的字段,_data字段列出了该文件在Android文件系统上的精确路径。这个字段不仅是供客户端使用,而且也可以供ContentResolver使用。客户端可以调用ContentResolver.openOutputStream()方法来处理该URI指向的文件资源,如果是ContentResolver本身的话,由于其持有的权限比客户端要高,所以它能直接访问该数据文件。
声明public static String型的变量,用于指定要从游标处返回的数据列。
查询返回一个Cursor类型的对象 。所有执行写操作的方法如insert(), update() 以及delete()都将被监听。我们可以通过使用ContentResover().notifyChange()方法来通知监听器关于数据更新的信息。
在AndroidMenifest.xml中使用标签来设置Content Provider。
如果要处理的数据类型是一种比较新的类型,就必须先定义一个新的MIME类型,以供ContentProvider.geType(url)来返回。MIME类型有两种形式:一种是为指定的单个记录的,还有一种是为多条记录的。
3 增删改查操作 3.1 插入数据 要增加记录,可以调用ContentResolver.insert() 方法,该方法接受一个要增加的记录的目标URI,以及一个包含了新记录值的Map对象,调用后的返回值是新记录的URI,包含记录号。
1
2
3
4
ContentValues values = new ContentValues(); values.put(“column1”, "text"); values.put("column2", 1); getContentResolver().insert(uri, values);
3.2 更新数据 可以使用ContentResolver.update() 方法来修改数据。
1
2
3
ContentValues valuse = new ContentValues(); valuse.put("column1", ""); getContentResolver().update(uri, values, "column1 = ? and column2 = ?", new String[]{"text", 1});
3.3 删除数据 Content Provider中的getContextResolver.delete() 方法可以用来删除记录。
1 getContentResolver().delete(uri , "column2 = ?", new String[]{ "1"});
3.4 查询数据 在Content Provider中使用的查询字符串有别于标准的SQL查询。很多诸如select、add、delete、modify等操作我们都使用一种特殊的URI来进行,这种URI由3个部分组成,“content://”代表数据的路径,和一个可选的标识数据的ID。以下是一些示例URI:
content://media/internal/images 这个URI将返回设备上存储的所有图片
尽管这种查询字符串格式很常见,但是它看起来还是有点令人迷惑。为此,Android提供一系列的帮助类(在android.provider包下),里面包含了很多以类变量形式给出的查询字符串,这种方式更容易让我们理解一点,参见下例:
MediaStore.Images.Media.INTERNAL_CONTENT_URI
因此,如上面 content://contacts/people/45 这个 URI 就可以写成如下形式:
1 Uri person = ContentUris.withAppendedId(People.CONTENT_URI, 45);
然后执行数据查询:
1 Cursor cur = managedQuery(person, null, null, null);
4 ContentProvider示例 该实例解释如何创建自己的内容提供者,让我们按照下面的步骤:
步骤
描述
1
使用Android Studio创建Android应用程序并命名为Content Provider,在包com.ihui.contentprovidersqlite下,并建立空活动。
2
修改主要活动文件MainActivity.java来添加两个新的方法onClickAddName()和onClickRetrieveStudents()。
3
在包com.ihui.contentprovidersqlite下创建新的Java文件StudentsProvider.java来定义实际的提供者,并关联方法。
4
使用<provider…/>标签在AndroidManifest.xml中注册内容提供者。
5
修改res/layout/activity_main.xml文件的默认内容来包含添加学生记录的简单界面。
6
启动Android模拟器来运行应用程序,并验证应用程序所做改变的结果。
4.1 创建内容提供程序 在包com.ihui.contentprovidersqlite下创建新的文件StudentsProvider.java。以下是src/com.ihui.contentprovidersqlite/StudentsProvider.java的内容。
1
2
3
4
5
6
7
8
9
10
11
12
13
14
15
16
17
18
19
20
21
22
23
24
25
26
27
28
29
30
31
32
33
34
35
36
37
38
39
40
41
42
43
44
45
46
47
48
49
50
51
52
53
54
55
56
57
58
59
60
61
62
63
64
65
66
67
68
69
70
71
72
73
74
75
76
77
78
79
80
81
82
83
84
85
86
87
88
89
90
91
92
93
94
95
96
97
98
99
100
101
102
103
104
105
106
107
108
109
110
111
112
113
114
115
116
117
118
119
120
121
122
123
124
125
126
127
128
129
130
131
132
133
134
135
136
137
138
139
140
141
142
143
144
145
146
147
148
149
150
151
152
153
154
155
156
157
158
159
160
161
162
163
164
165
166
167
168
169
170
171
172
173
174
175
176
177
178
179
180
181
182
183
184
185
186
187
188
189
190
191
192
193
194
195
196
197
198
199
200
201
202
203
204
package com.ihui.contentprovidersqlite; import java.util.HashMap; import android.content.ContentProvider; import android.content.ContentUris; import android.content.ContentValues; import android.content.Context; import android.content.UriMatcher; import android.database.Cursor; import android.database.SQLException; import android.database.sqlite.SQLiteDatabase; import android.database.sqlite.SQLiteOpenHelper; import android.database.sqlite.SQLiteQueryBuilder; import android.net.Uri; import android.text.TextUtils; public class StudentsProvider extends ContentProvider { static final String PROVIDER_NAME = "com.ihui.contentprovidersqlite.College"; static final String URL = "content://" + PROVIDER_NAME + "/students"; static final Uri CONTENT_URI = Uri.parse(URL); static final String _ID = "_id"; static final String NAME = "name"; static final String GRADE = "grade"; private static HashMap<String, String> STUDENTS_PROJECTION_MAP; static final int STUDENTS = 1; static final int STUDENT_ID = 2; static final UriMatcher uriMatcher; static{ uriMatcher = new UriMatcher(UriMatcher.NO_MATCH); uriMatcher.addURI(PROVIDER_NAME, "students", STUDENTS); uriMatcher.addURI(PROVIDER_NAME, "students/#", STUDENT_ID); } /** * 数据库特定常量声明 */ private SQLiteDatabase db; static final String DATABASE_NAME = "College"; static final String STUDENTS_TABLE_NAME = "students"; static final int DATABASE_VERSION = 1; static final String CREATE_DB_TABLE = " CREATE TABLE " + STUDENTS_TABLE_NAME + " (_id INTEGER PRIMARY KEY AUTOINCREMENT, " + " name TEXT NOT NULL, " + " grade TEXT NOT NULL);"; /** * 创建和管理提供者内部数据源的帮助类. */ private static class DatabaseHelper extends SQLiteOpenHelper { DatabaseHelper(Context context){ super(context, DATABASE_NAME, null, DATABASE_VERSION); } @Override public void onCreate(SQLiteDatabase db) { db.execSQL(CREATE_DB_TABLE); } @Override public void onUpgrade(SQLiteDatabase db, int oldVersion, int newVersion) { db.execSQL("DROP TABLE IF EXISTS " + STUDENTS_TABLE_NAME); onCreate(db); } } @Override public boolean onCreate() { Context context = getContext(); DatabaseHelper dbHelper = new DatabaseHelper(context); /** * 如果不存在,则创建一个可写的数据库。 */ db = dbHelper.getWritableDatabase(); return (db == null)? false:true; } @Override public Uri insert(Uri uri, ContentValues values) { /** * 添加新学生记录 */ long rowID = db.insert( STUDENTS_TABLE_NAME, "", values); /** * 如果记录添加成功 */ if (rowID > 0) { Uri _uri = ContentUris.withAppendedId(CONTENT_URI, rowID); getContext().getContentResolver().notifyChange(_uri, null); return _uri; } throw new SQLException("Failed to add a record into " + uri); } @Override public Cursor query(Uri uri, String[] projection, String selection,String[] selectionArgs, String sortOrder) { SQLiteQueryBuilder qb = new SQLiteQueryBuilder(); qb.setTables(STUDENTS_TABLE_NAME); switch (uriMatcher.match(uri)) { case STUDENTS: qb.setProjectionMap(STUDENTS_PROJECTION_MAP); break; case STUDENT_ID: qb.appendWhere( _ID + "=" + uri.getPathSegments().get(1)); break; default: throw new IllegalArgumentException("Unknown URI " + uri); } if (sortOrder == null || sortOrder == ""){ /** * 默认按照学生姓名排序 */ sortOrder = NAME; } Cursor c = qb.query(db, projection, selection, selectionArgs,null, null, sortOrder); /** * 注册内容URI变化的监听器 */ c.setNotificationUri(getContext().getContentResolver(), uri); return c; } @Override public int delete(Uri uri, String selection, String[] selectionArgs) { int count = 0; switch (uriMatcher.match(uri)){ case STUDENTS: count = db.delete(STUDENTS_TABLE_NAME, selection, selectionArgs); break; case STUDENT_ID: String id = uri.getPathSegments().get(1); count = db.delete( STUDENTS_TABLE_NAME, _ID + " = " + id + (!TextUtils.isEmpty(selection) ? " AND (" + selection + ')' : ""), selectionArgs); break; default: throw new IllegalArgumentException("Unknown URI " + uri); } getContext().getContentResolver().notifyChange(uri, null); return count; } @Override public int update(Uri uri, ContentValues values, String selection, String[] selectionArgs) { int count = 0; switch (uriMatcher.match(uri)){ case STUDENTS: count = db.update(STUDENTS_TABLE_NAME, values, selection, selectionArgs); break; case STUDENT_ID: count = db.update(STUDENTS_TABLE_NAME, values, _ID + " = " + uri.getPathSegments().get(1) + (!TextUtils.isEmpty(selection) ? " AND (" +selection + ')' : ""), selectionArgs); break; default: throw new IllegalArgumentException("Unknown URI " + uri ); } getContext().getContentResolver().notifyChange(uri, null); return count; } @Override public String getType(Uri uri) { switch (uriMatcher.match(uri)){ /** * 获取所有学生记录 */ case STUDENTS: return "vnd.android.cursor.dir/vnd.com.ihui.contentprovidersqlite.students"; /** * 获取一个特定的学生 */ case STUDENT_ID: return "vnd.android.cursor.item/vnd.com.ihui.contentprovidersqlite.students"; default: throw new IllegalArgumentException("Unsupported URI: " + uri); } } }
4.2 注册内容提供程序 以下是修改后的AndroidManifest.xml文件。这里添加了<provider…/>标签来包含内容提供者
1
2
3
4
5
6
7
8
9
10
11
12
13
14
15
16
17
18
19
20
21
22
23
24
25
26
27
<?xml version="1.0" encoding="utf-8"?> <manifest xmlns:android="http://schemas.android.com/apk/res/android" package="com.ihui.contentprovidersqlite"> <application android:allowBackup="true" android:icon="@mipmap/ic_launcher" android:label="@string/app_name" android:roundIcon="@mipmap/ic_launcher_round" android:supportsRtl="true" android:theme="@style/Theme.Helloworld"> <activity android:name=".MainActivity" android:exported="true"> <intent-filter> <action android:name="android.intent.action.MAIN" /> <category android:name="android.intent.category.LAUNCHER" /> </intent-filter> </activity> <provider android:authorities="com.ihui.contentprovidersqlite.College" android:name=".StudentsProvider" > </provider> </application> </manifest>
4.3 访问内容注册程序 下面是修改的主要活动文件src/com.ihui.contentprovidersqlite/MainActivity.java的内容。该文件包含每个基础的生命周期方法。我们添加了两个新的方法,onClickAddName()和onClickRetrieveStudents()来让应用程序处理用户交互。
1
2
3
4
5
6
7
8
9
10
11
12
13
14
15
16
17
18
19
20
21
22
23
24
25
26
27
28
29
30
31
32
33
34
35
36
37
38
39
40
41
42
43
44
45
46
47
48
49
50
51
52
53
54
55
56
57
58
59
60
61
62
63
64
package com.ihui.contentprovidersqlite; import androidx.appcompat.app.AppCompatActivity; import android.net.Uri; import android.os.Bundle; import android.content.ContentValues; import android.content.CursorLoader; import android.database.Cursor; import android.util.Log; import android.view.Menu; import android.view.View; import android.widget.EditText; import android.widget.Toast; import com.ihui.contentprovidersqlite.R; public class MainActivity extends AppCompatActivity { @Override protected void onCreate(Bundle savedInstanceState) { super.onCreate(savedInstanceState); setContentView(R.layout.activity_main); } public void onClickAddName(View view) { // Add a new student record ContentValues values = new ContentValues(); values.put(StudentsProvider.NAME, ((EditText)findViewById(R.id.editText2)).getText().toString()); values.put(StudentsProvider.GRADE, ((EditText)findViewById(R.id.editText3)).getText().toString()); Uri uri = getContentResolver().insert( StudentsProvider.CONTENT_URI, values); Toast.makeText(getBaseContext(), uri.toString(), Toast.LENGTH_LONG).show(); } public void onClickRetrieveStudents(View view) { // Retrieve student records String URL = "content://com.ihui.contentprovidersqlite.College/students"; String tmpRecord = ""; Uri students = Uri.parse(URL); Cursor c = managedQuery(students, null, null, null, "name"); if (c.moveToFirst()) { do{ tmpRecord = c.getString(c.getColumnIndex(StudentsProvider._ID)) + ", " + c.getString(c.getColumnIndex(StudentsProvider.NAME)) + ", " + c.getString(c.getColumnIndex(StudentsProvider.GRADE)); Log.d("onClickRetrieveStudents", tmpRecord); Toast.makeText(this, c.getString(c.getColumnIndex(StudentsProvider._ID)) + ", " + c.getString(c.getColumnIndex(StudentsProvider.NAME)) + ", " + c.getString(c.getColumnIndex(StudentsProvider.GRADE)), Toast.LENGTH_SHORT).show(); } while (c.moveToNext()); } } }
4.4 设置布局文件 下面是res/layout/activity_main.xml文件的内容
1
2
3
4
5
6
7
8
9
10
11
12
13
14
15
16
17
18
19
20
21
22
23
24
25
26
27
28
29
30
31
32
33
34
35
36
37
38
39
40
41
42
43
44
45
46
47
48
49
50
51
52
53
54
55
56
57
58
59
60
61
62
63
64
65
66
67
68
69
70
71
72
73
74
75
76
77
78
79
80
81
82
83
84
85
86
87
88
89
90
91
92
93
94
95
96
97
98
99
100
101
102
103
104
105
106
107
108
109
110
111
112
113
114
115
<?xml version="1.0" encoding="utf-8"?> <androidx.constraintlayout.widget.ConstraintLayout xmlns:android="http://schemas.android.com/apk/res/android" xmlns:app="http://schemas.android.com/apk/res-auto" xmlns:tools="http://schemas.android.com/tools" android:layout_width="match_parent" android:layout_height="match_parent" tools:context=".MainActivity"> <TextView android:id="@+id/textView1" android:layout_width="wrap_content" android:layout_height="wrap_content" android:layout_alignParentTop="true" android:layout_centerHorizontal="true" android:text="内容提供者实例" android:textSize="30dp" app:layout_constraintBottom_toBottomOf="parent" app:layout_constraintEnd_toEndOf="parent" app:layout_constraintStart_toStartOf="parent" app:layout_constraintTop_toTopOf="parent" app:layout_constraintVertical_bias="0.023" tools:ignore="MissingConstraints" /> <ImageButton android:id="@+id/imageButton" android:layout_width="wrap_content" android:layout_height="wrap_content" android:layout_below="@+id/textView2" android:layout_centerHorizontal="true" android:src="@drawable/img" app:layout_constraintBottom_toBottomOf="parent" app:layout_constraintEnd_toEndOf="parent" app:layout_constraintHorizontal_bias="0.497" app:layout_constraintStart_toStartOf="parent" app:layout_constraintTop_toTopOf="parent" app:layout_constraintVertical_bias="0.17" tools:ignore="MissingConstraints" /> <EditText android:id="@+id/editText2" android:layout_width="wrap_content" android:layout_height="wrap_content" android:layout_alignStart="@+id/textView1" android:layout_alignLeft="@+id/textView1" android:layout_alignTop="@+id/editText" android:layout_alignEnd="@+id/textView1" android:layout_alignRight="@+id/textView1" android:hint="姓名" android:textColorHint="@android:color/holo_blue_light" app:layout_constraintBottom_toBottomOf="parent" app:layout_constraintEnd_toEndOf="parent" app:layout_constraintHorizontal_bias="0.279" app:layout_constraintStart_toStartOf="parent" app:layout_constraintTop_toTopOf="parent" app:layout_constraintVertical_bias="0.466" tools:ignore="MissingConstraints" /> <EditText android:id="@+id/editText3" android:layout_width="wrap_content" android:layout_height="wrap_content" android:layout_below="@+id/editText" android:layout_alignStart="@+id/editText2" android:layout_alignLeft="@+id/editText2" android:layout_alignEnd="@+id/editText2" android:layout_alignRight="@+id/editText2" android:hint="年级" android:textColorHint="@android:color/holo_blue_bright" app:layout_constraintBottom_toBottomOf="parent" app:layout_constraintEnd_toEndOf="parent" app:layout_constraintHorizontal_bias="0.274" app:layout_constraintStart_toStartOf="parent" app:layout_constraintTop_toTopOf="parent" app:layout_constraintVertical_bias="0.577" tools:ignore="MissingConstraints,UnknownId" /> <Button android:id="@+id/button2" android:layout_width="wrap_content" android:layout_height="wrap_content" android:layout_below="@+id/editText3" android:layout_alignStart="@+id/textView2" android:layout_alignLeft="@+id/textView2" android:layout_alignEnd="@+id/textView2" android:layout_alignRight="@+id/textView2" android:onClick="onClickAddName" android:text="添加" app:layout_constraintBottom_toBottomOf="parent" app:layout_constraintEnd_toEndOf="parent" app:layout_constraintHorizontal_bias="0.498" app:layout_constraintStart_toStartOf="parent" app:layout_constraintTop_toTopOf="parent" app:layout_constraintVertical_bias="0.666" tools:ignore="MissingConstraints,UnknownId" /> <Button android:id="@+id/button" android:layout_width="wrap_content" android:layout_height="wrap_content" android:layout_below="@+id/button2" android:layout_alignStart="@+id/button2" android:layout_alignLeft="@+id/button2" android:layout_alignEnd="@+id/editText3" android:layout_alignRight="@+id/editText3" android:onClick="onClickRetrieveStudents" android:text="查询" app:layout_constraintBottom_toBottomOf="parent" app:layout_constraintEnd_toEndOf="parent" app:layout_constraintHorizontal_bias="0.498" app:layout_constraintStart_toStartOf="parent" app:layout_constraintTop_toTopOf="parent" app:layout_constraintVertical_bias="0.777" tools:ignore="MissingConstraints" /> </androidx.constraintlayout.widget.ConstraintLayout>
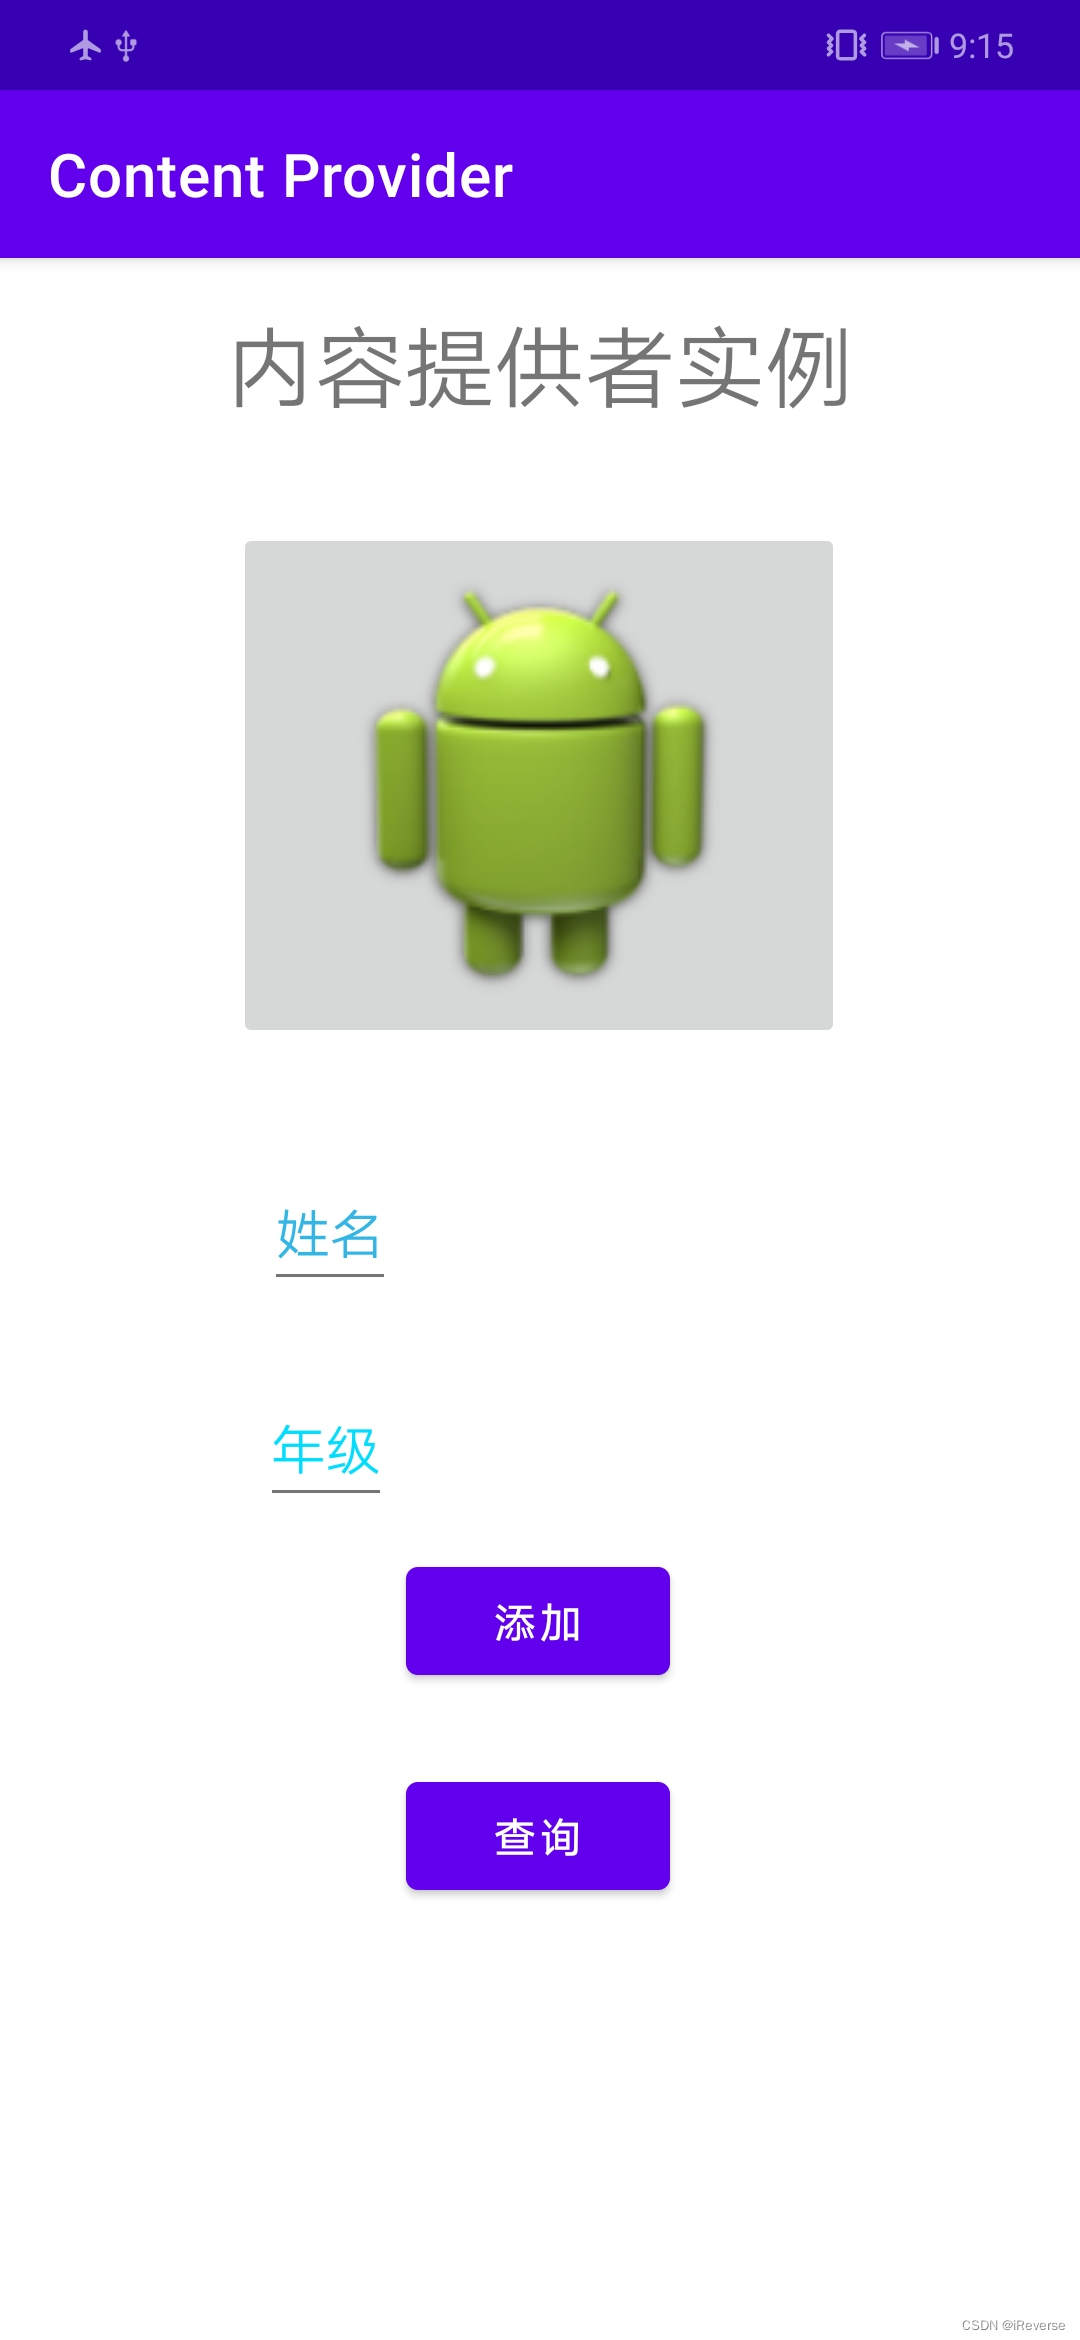
4.5 运行效果 Android Studio在真机安装应用程序并启动它。如果一切顺利,将在模拟器窗口上显示如图5所示。
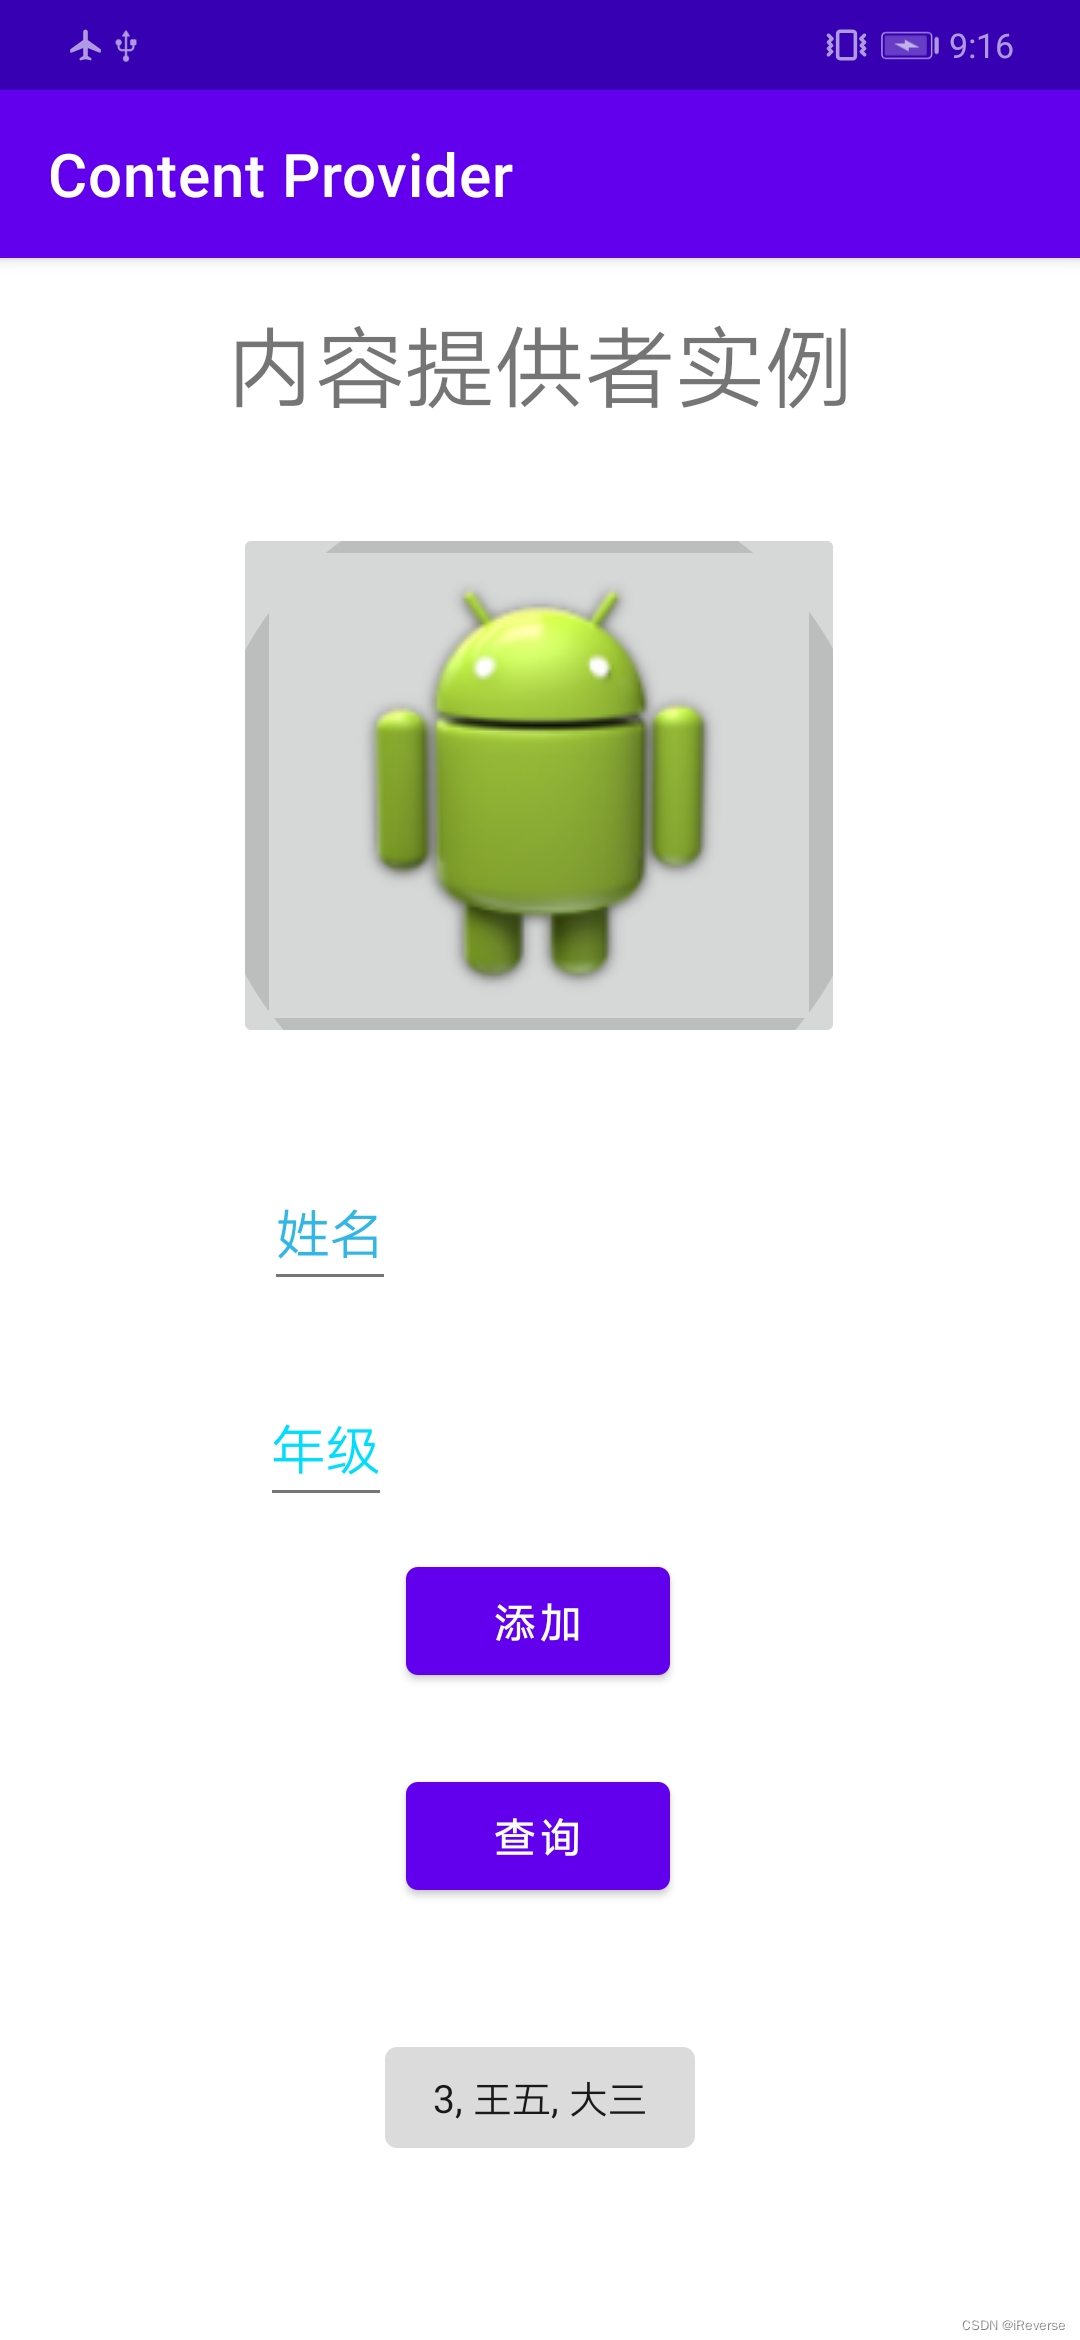
输入姓名和年级,并点击”添加”按钮,这将在SQLite数据库的表格中添加一条学生记录,并在底部删除一条信息。信息内容显示包含添加进数据库的记录数的内容提供者URI。这个操作使用了insert()方法。重复这个过程在我们的内容提供者的数据库中添加更多的学生。
一旦完成数据库记录的添加,是时候向内容提供者要求给回这些记录。点击”查询”按钮,这将通过实现的query()方法来获取并显示所有的数据记录,如图6所示。
5 参考文献
转载请注明来源,欢迎对文章中的引用来源进行考证,欢迎指出任何有错误或不够清晰的表达,可以邮件至 xingshuaikun@163.com。
